|
Hello, everyone!
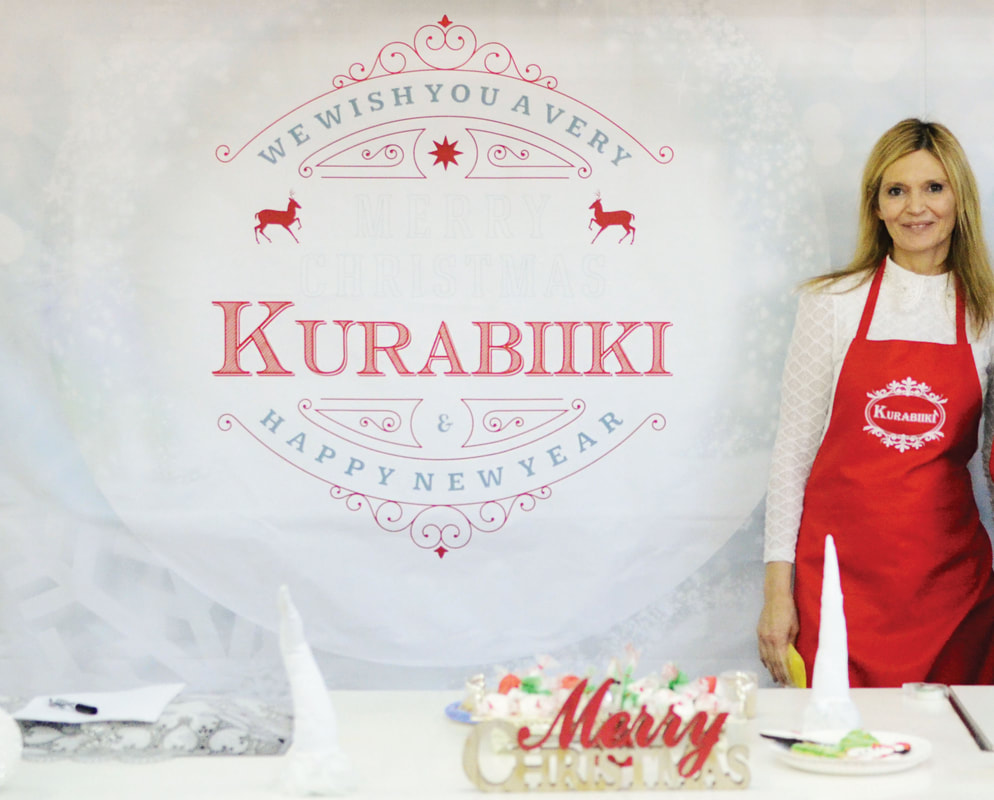
This year sure has been one for the books, hasn’t it? Nobody realized last January that the whole world would end up on lockdown and quarantining! 2020 was definitely a year that we do not ever want to repeat again. Not only did we have to move from Japan to Germany , but this year was extremely hard on me emotionally. I lost my father and a couple of months later my grandmother, two of the people who were closest to my heart! Amidst all of this, I had to do my duty as a military wife. My husband was deployed and I had two girls to take care of, to nurture, love, and help them adapt to this “new normal” that we are now living in. As summer approached, we were hoping things would get better, but then came the time to make the big move to Germany. As excited and happy as we were, I’m not even exaggerating when I say that this was one of the hardest moves that I have ever had to do, and as a military family we move pretty much every three years. You can imagine what it was like to pack up a whole house and move across oceans with two kids. Throw COVID into the mix, and well, it wasn’t exactly a party having to move to Europe. There were so many restrictions, quarantines, COVID tests, and more, not to mention the language barrier that we encountered when we first got there. But amongst all of that, I have to say that I am grateful. So grateful for the fact that we are all healthy, that we now have a home to call our own for the next three years, and that my children are back at school, giving them a sense of normalcy amongst all of this crazy that had been going on. What’s Going On With Kurabiiki? It breaks my heart that I was not able to say a proper goodbye to all of my clients and friends in Japan. I often dreamt of what my last class in Japan would have looked like. I can picture the smiles and I can hear the laughs. To my clients, friends, and those who helped me during our stay in Japan - I owe you everything! You supported me, worked with me, laughed with me, and helped me do whatever I needed to do to build my business up. I am eternally grateful for you all. I have never been part of such a tight-knit, loving, and supportive community. May good fortune smile upon you and every one of your dreams come true. I will never forget any of you. Due to restrictions here in Germany, I cannot say for certain when I will be able to start teaching in person again. However, you all know how much I love what I do, so if there is a way to share my knowledge of it and make someone happy, I am going to find it! Here’s The Scoop Many of you have sent notes along about recipes and booklets, what the consistency of royal icing should be, and many more questions. This gave me an idea! What if we had an online forum where we could discuss anything and everything cookies and cookie decorating? We can have our own “cookie community!” And so, Kurabiiki’s Cookie Decorating Crew was created! It will be a place where those who have taken my classes can join and share their experiences, ideas, and more. Questions are wholly welcomed with open arms! I will be posting all recipes and video tutorials for those who have taken my class as a refresher, free of charge of course! I am also planning advanced online classes as well, but I am still hashing out the details of that! Anyone who takes/has taken in-person or online classes will be able to join the group. Here is the link. I hope to see you there! https://www.facebook.com/groups/1092999424385388 Silviya
0 Comments
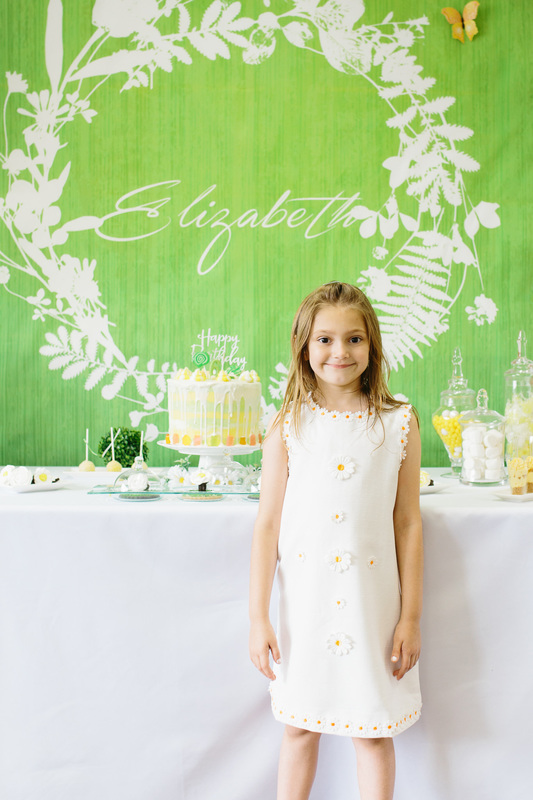
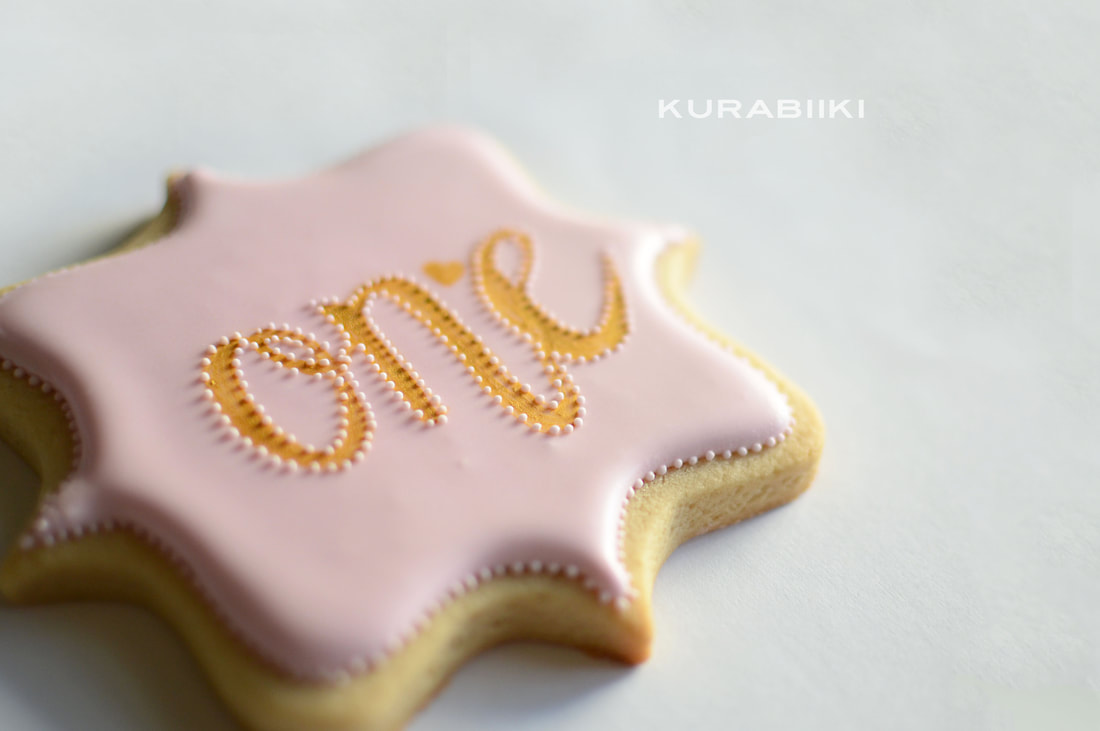
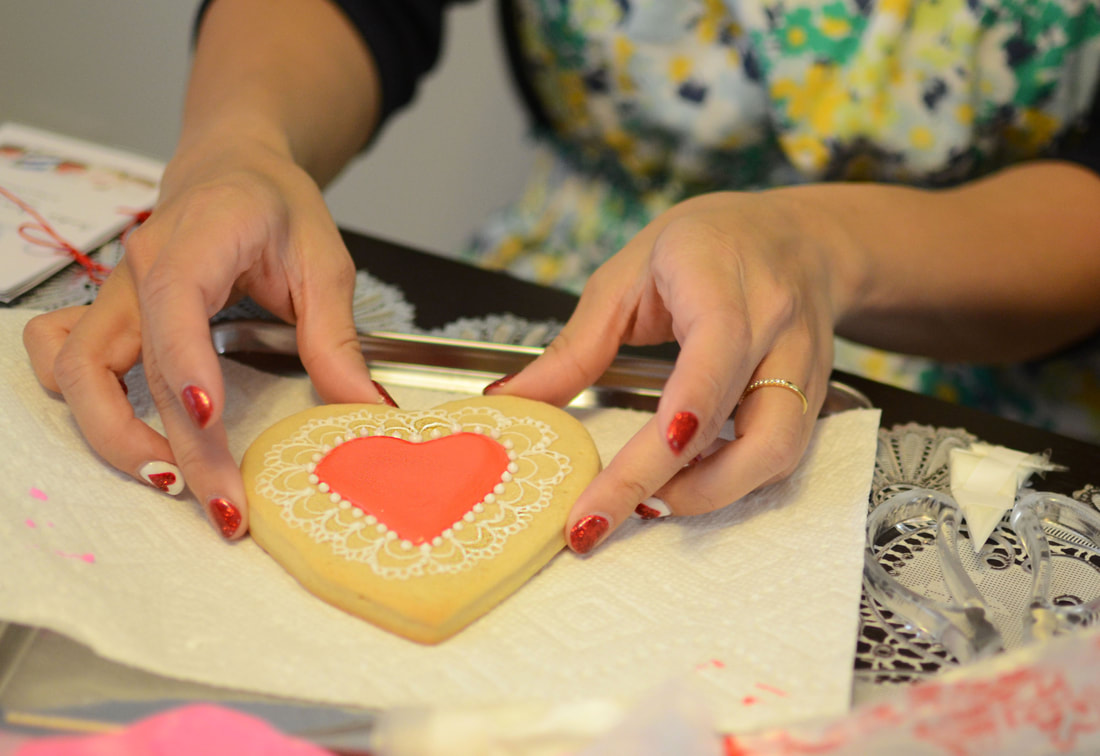
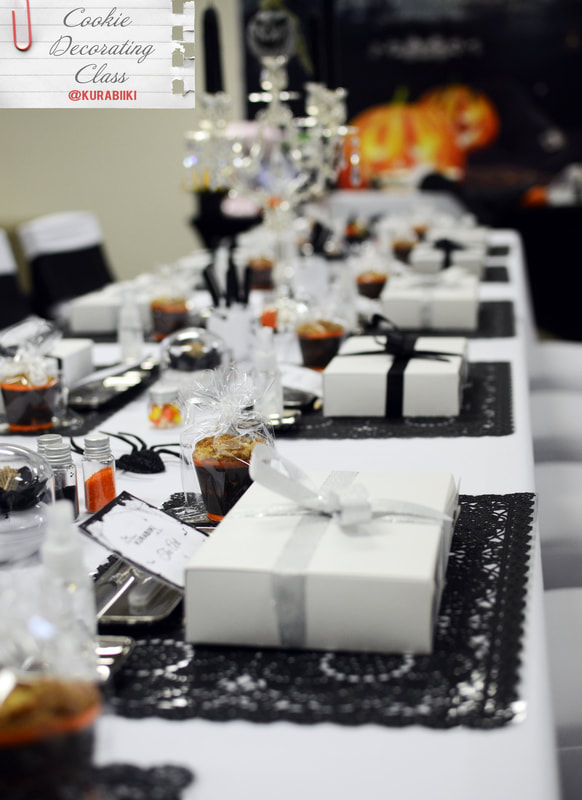
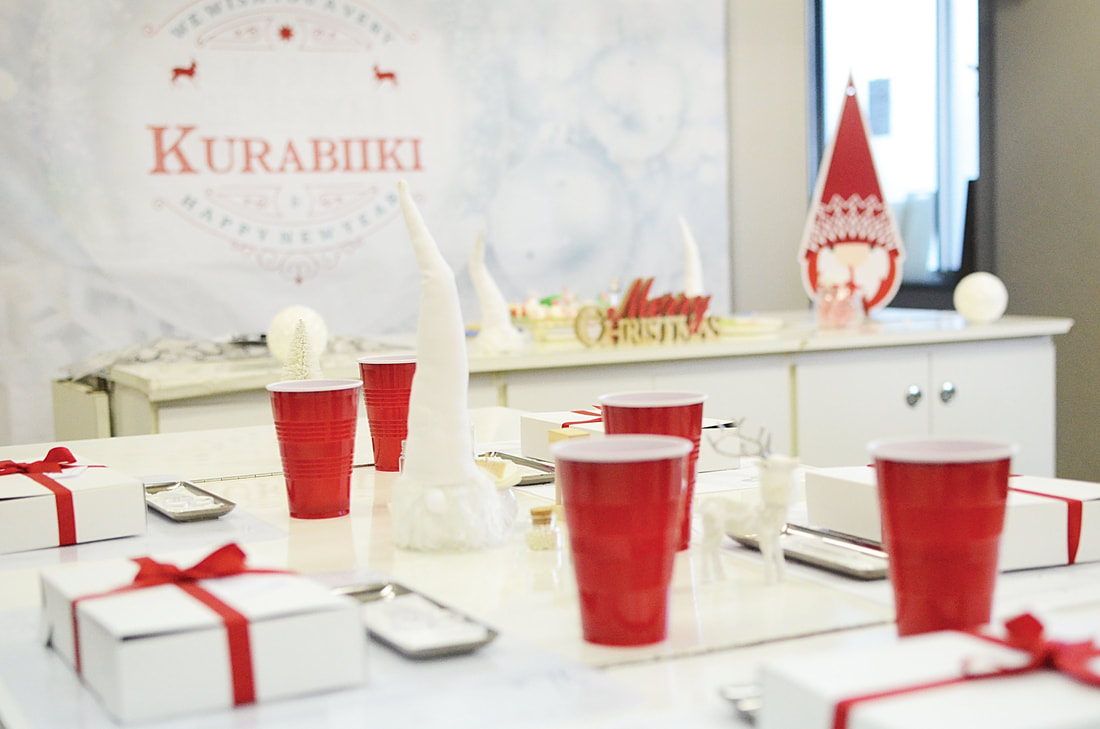
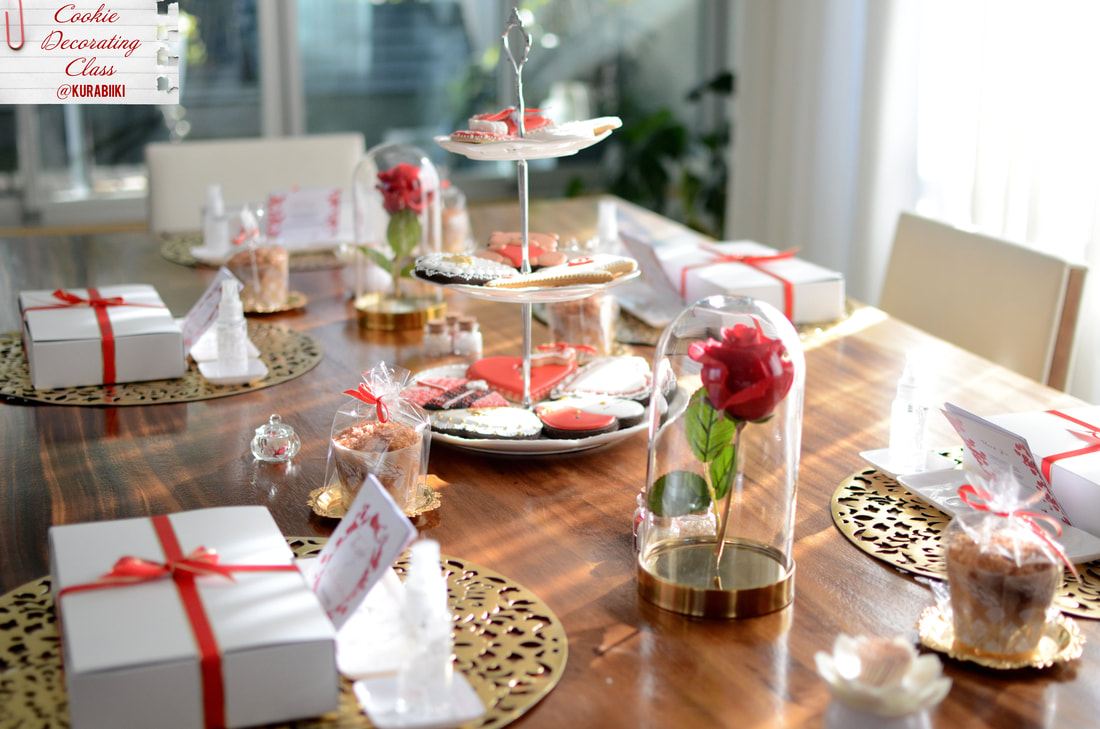
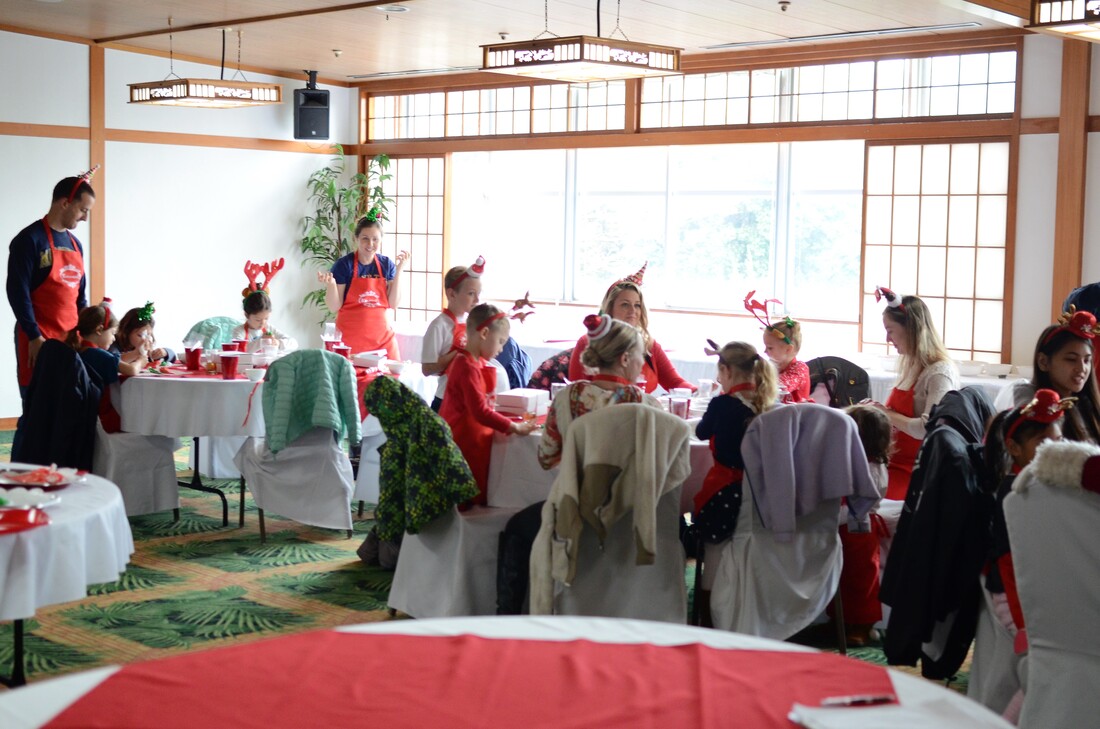
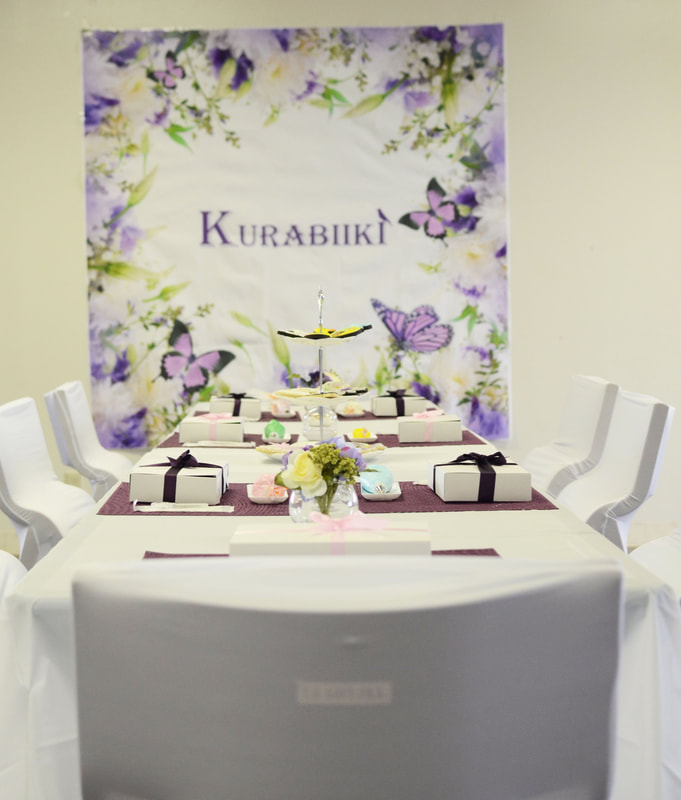
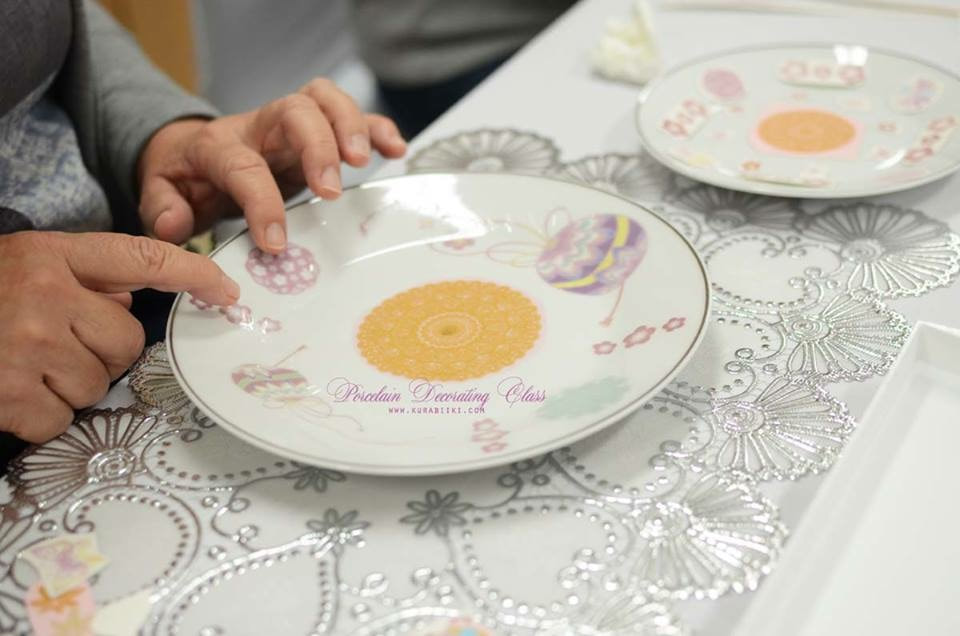
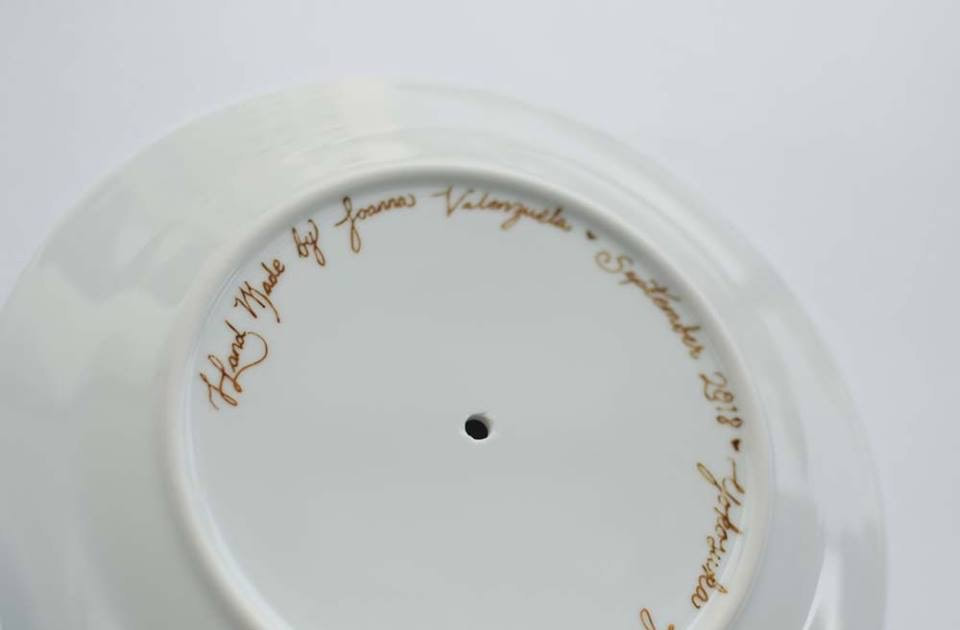
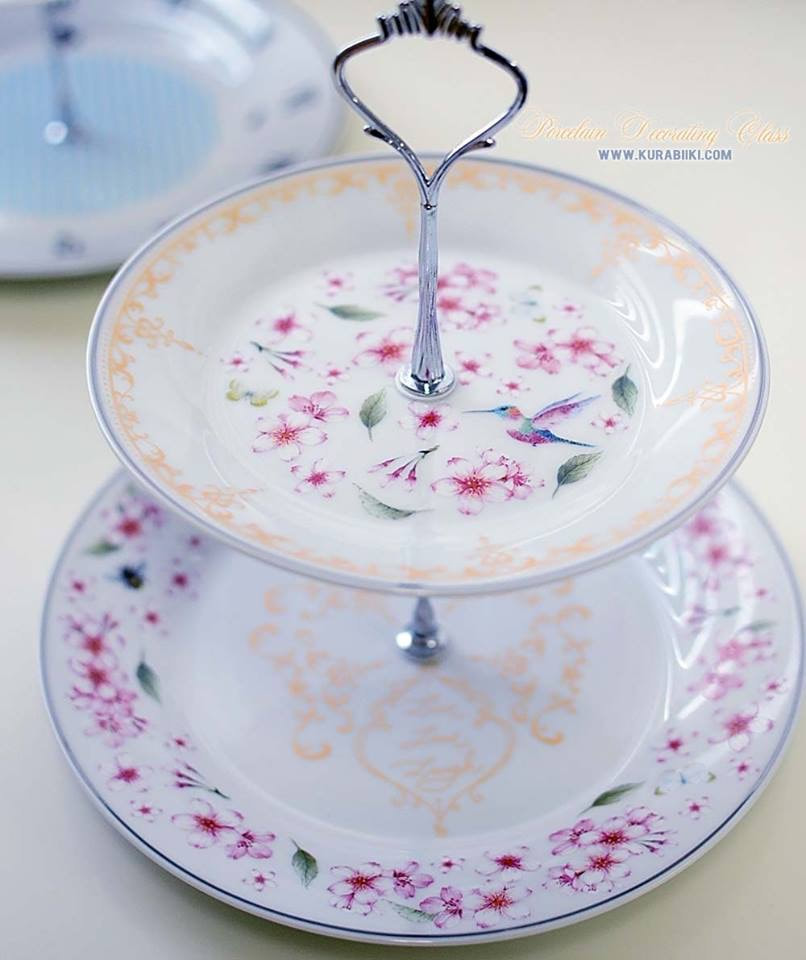
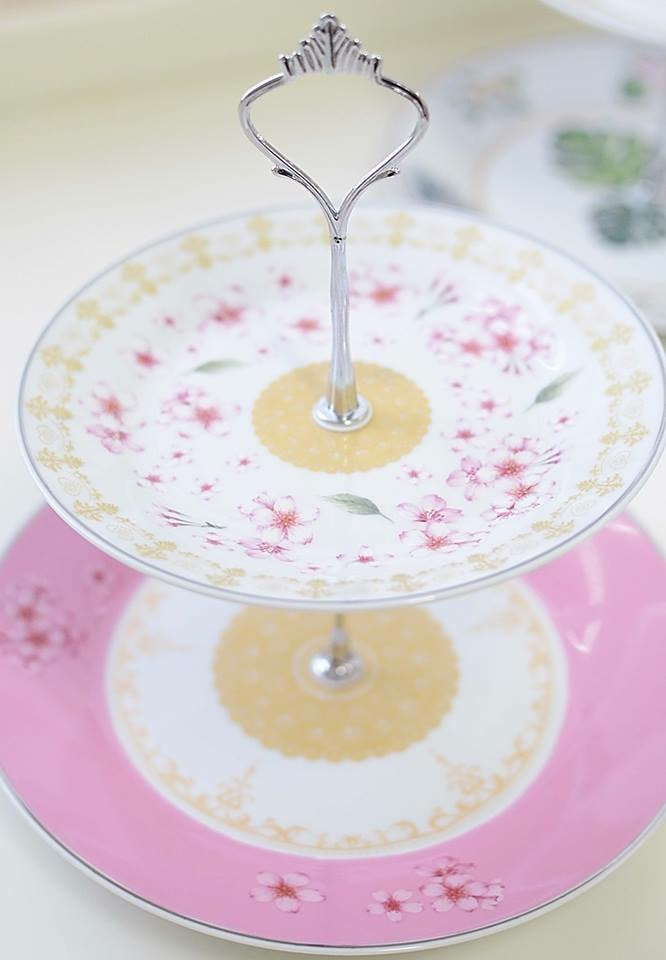
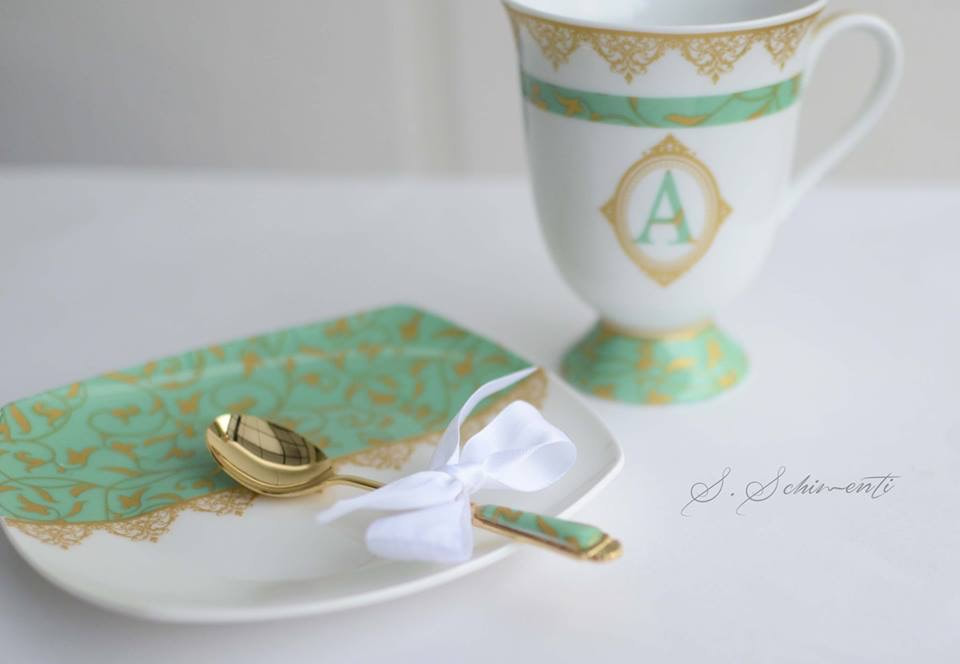
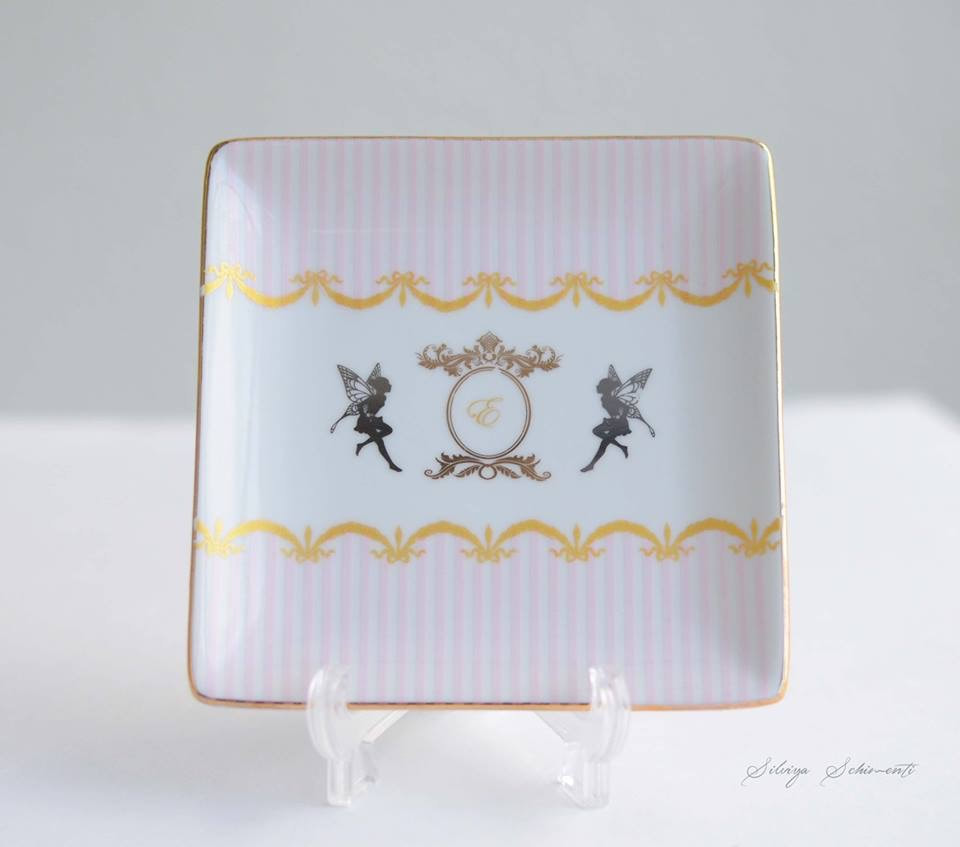
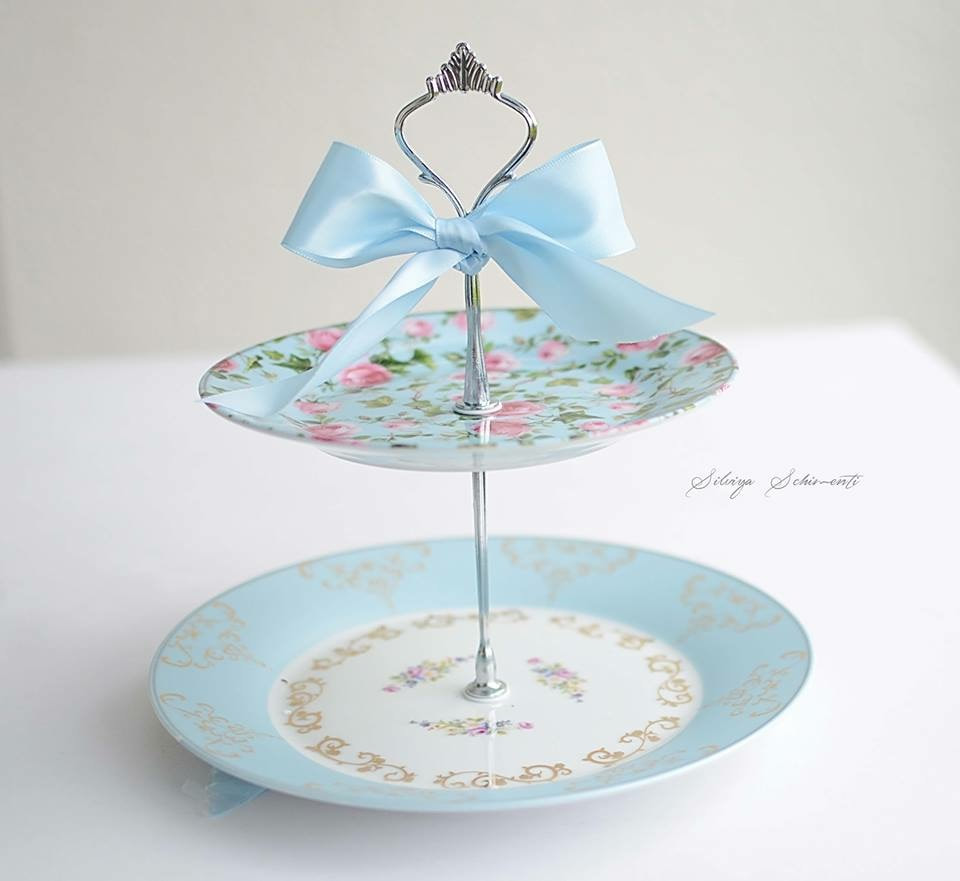
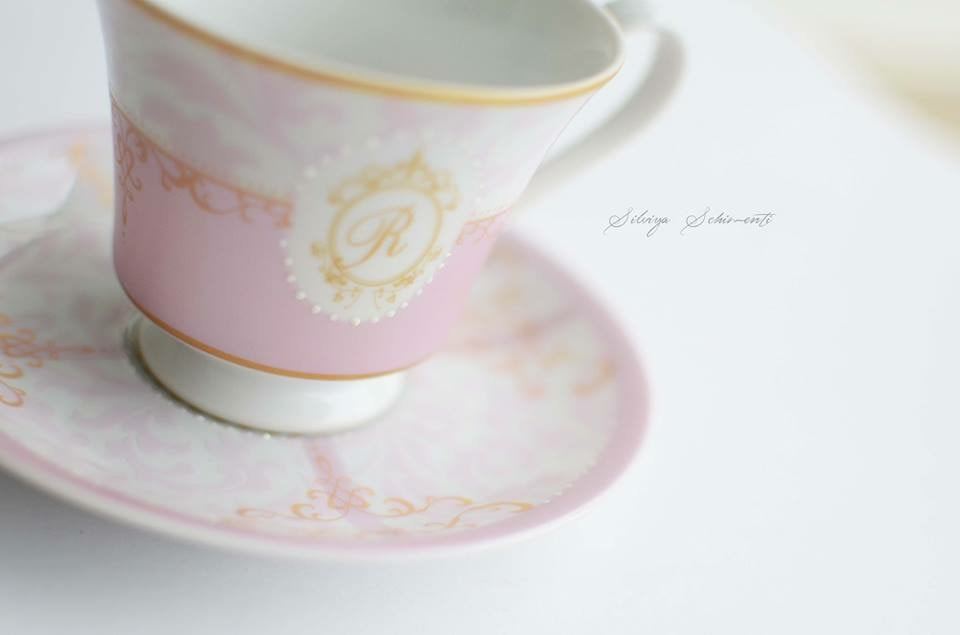
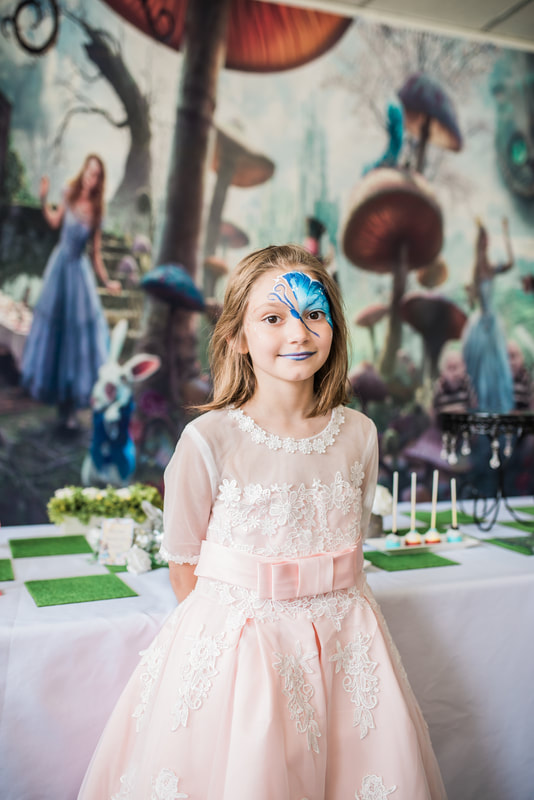
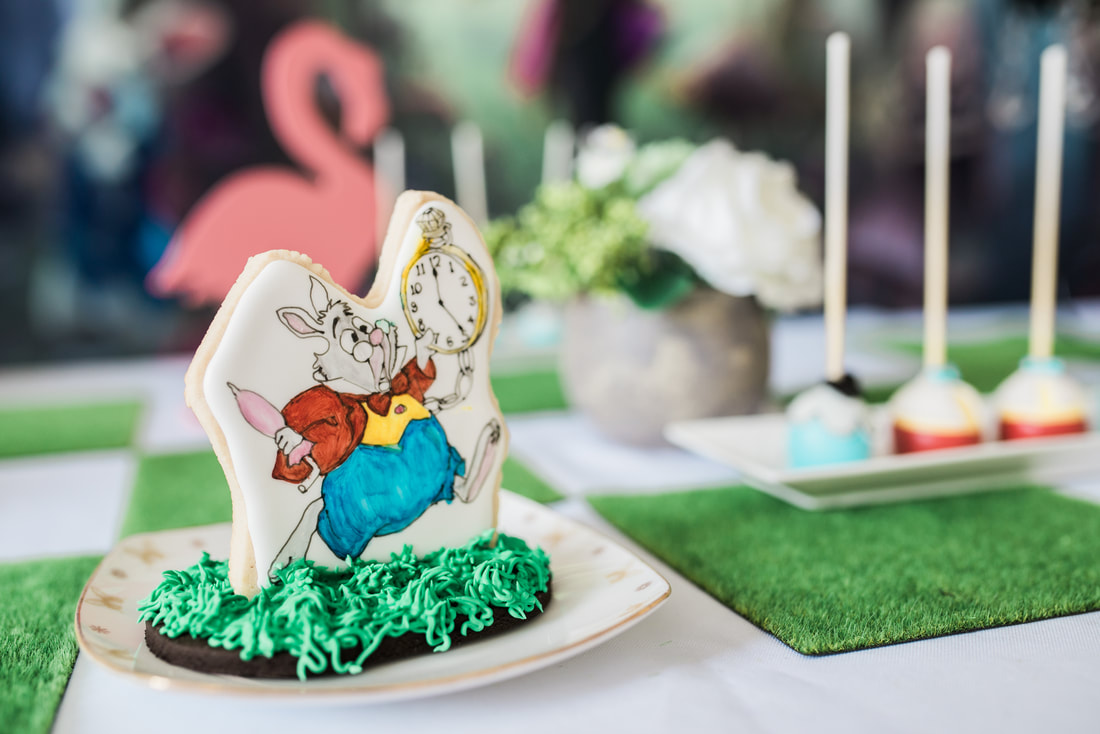
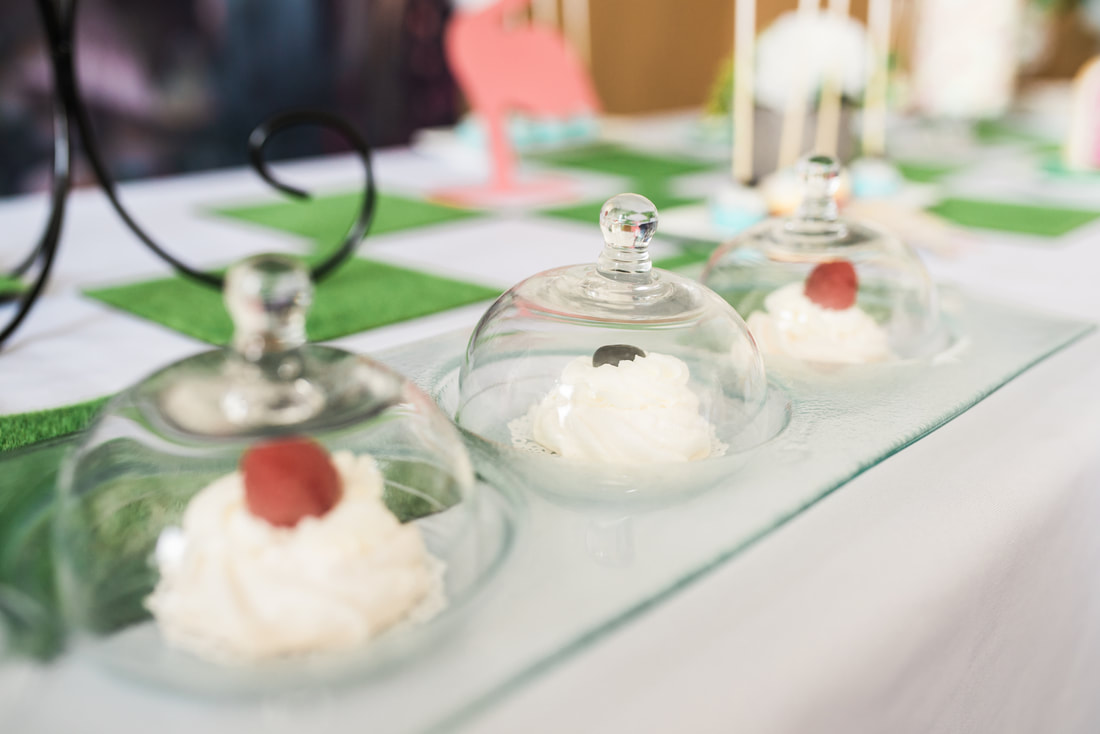
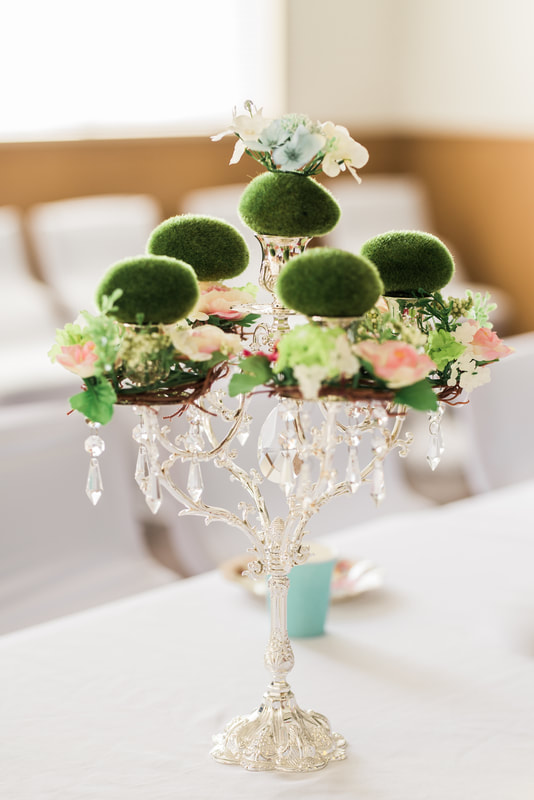
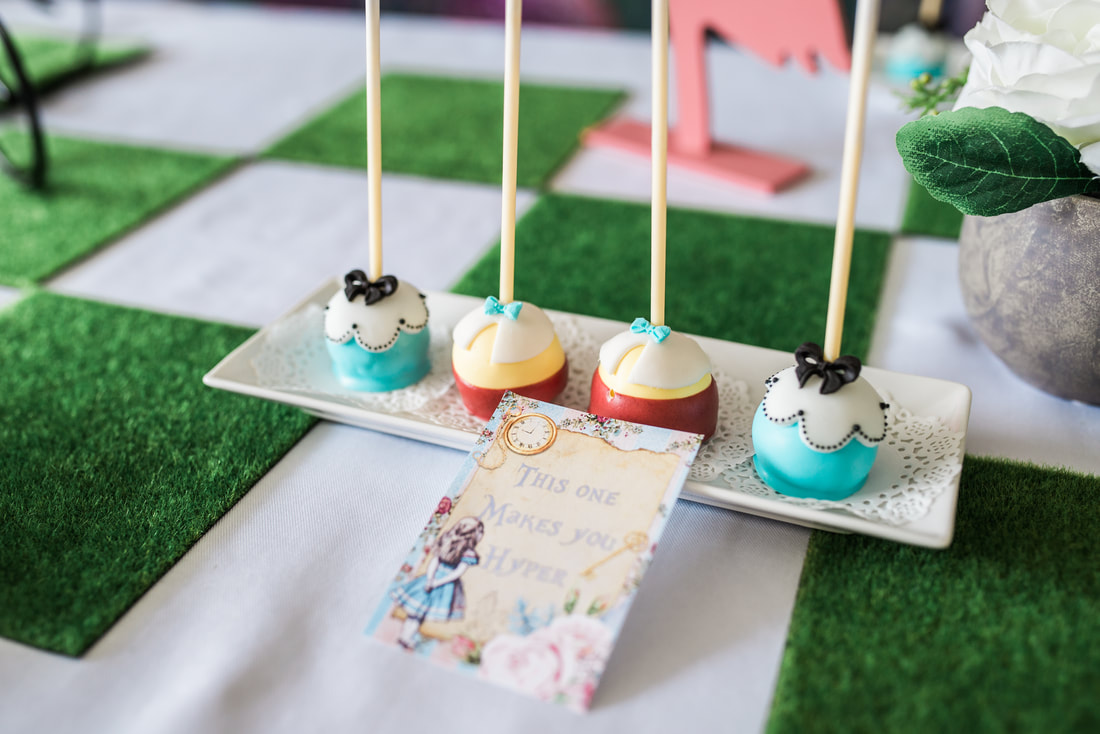
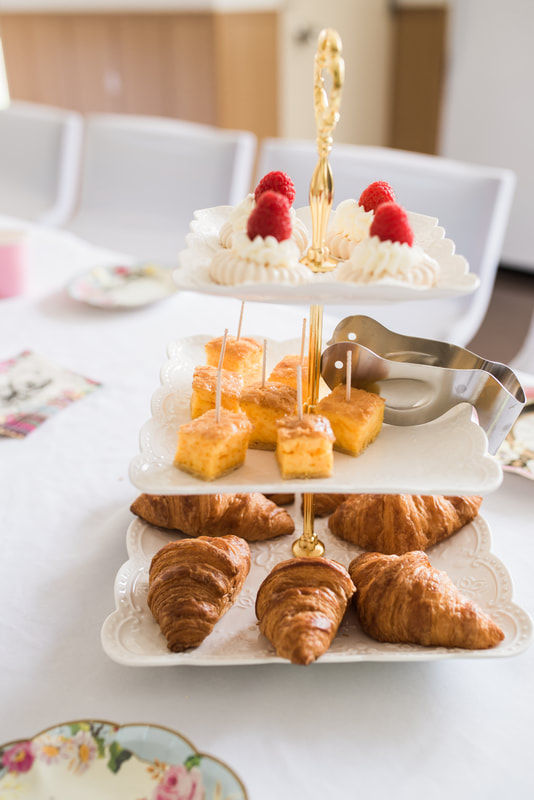
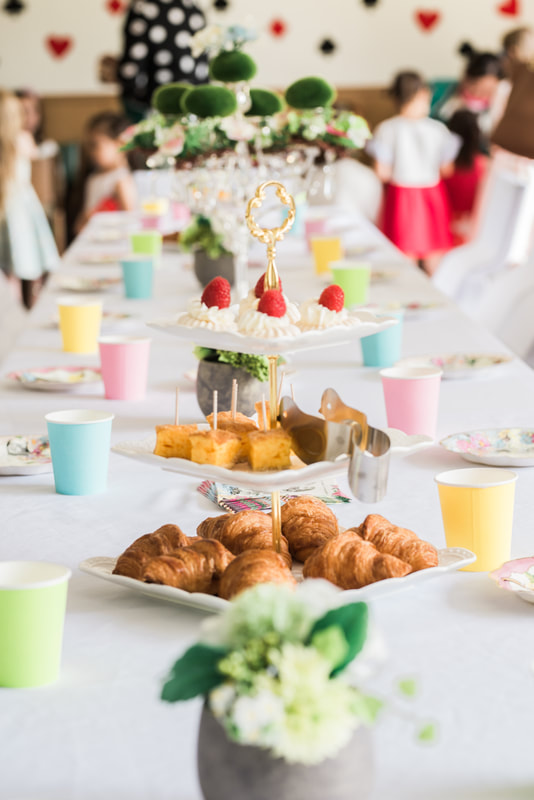
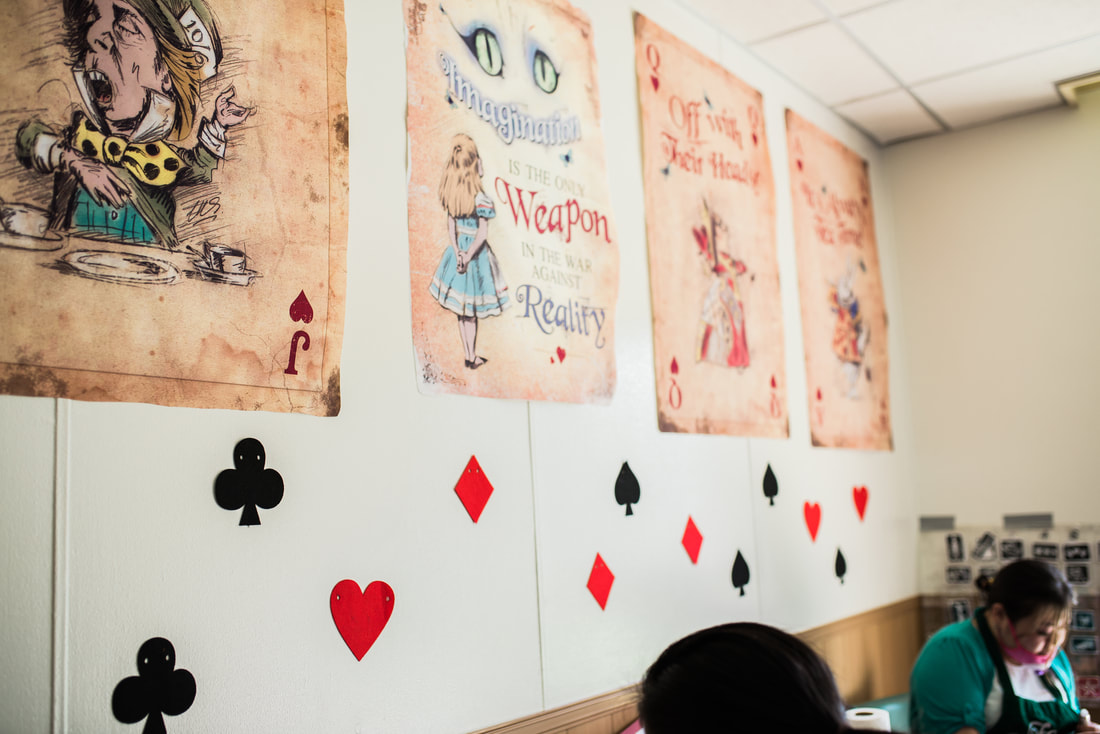
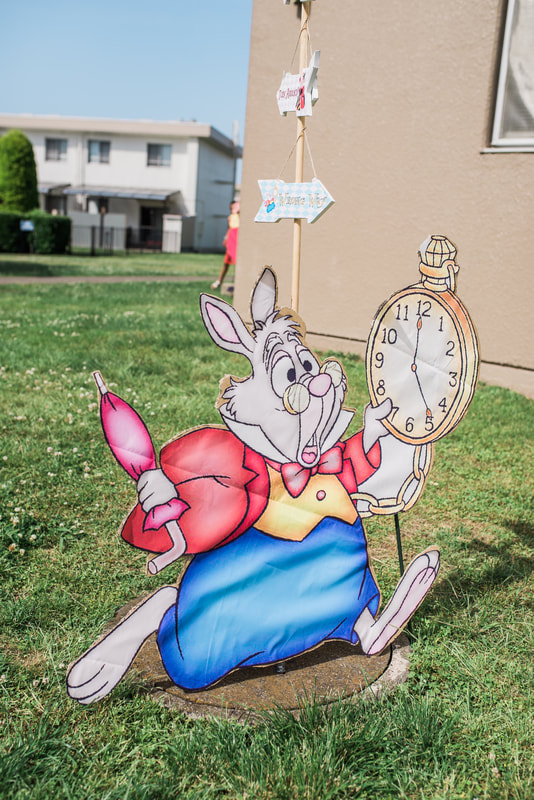
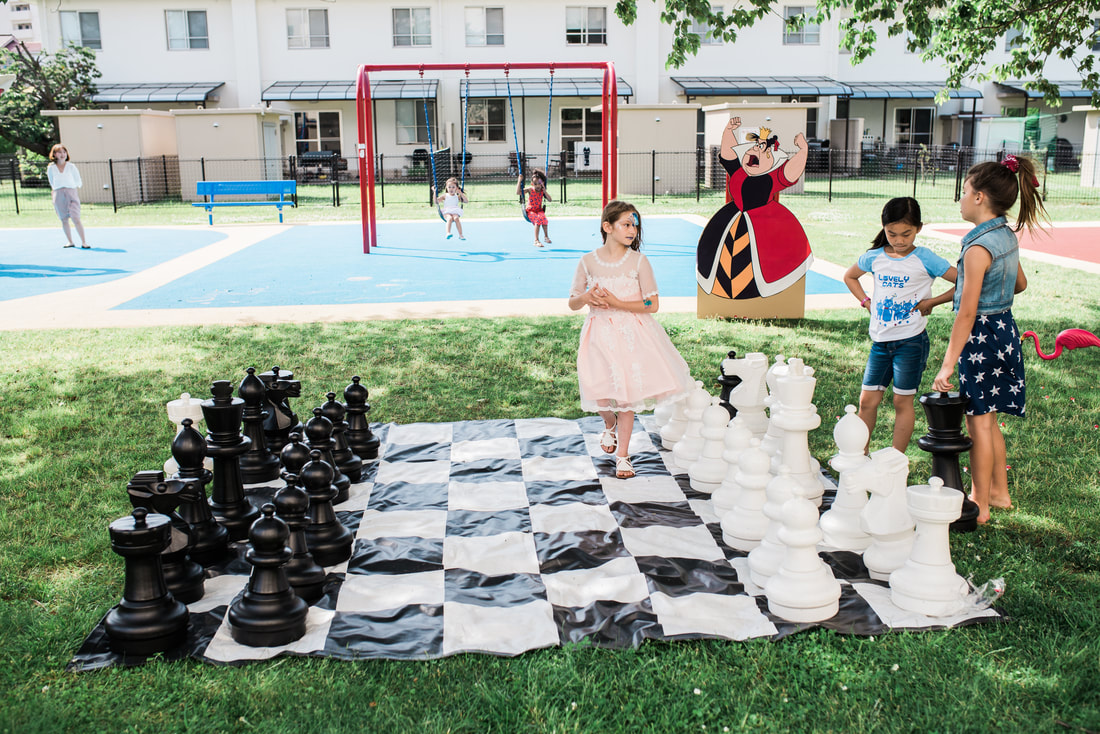
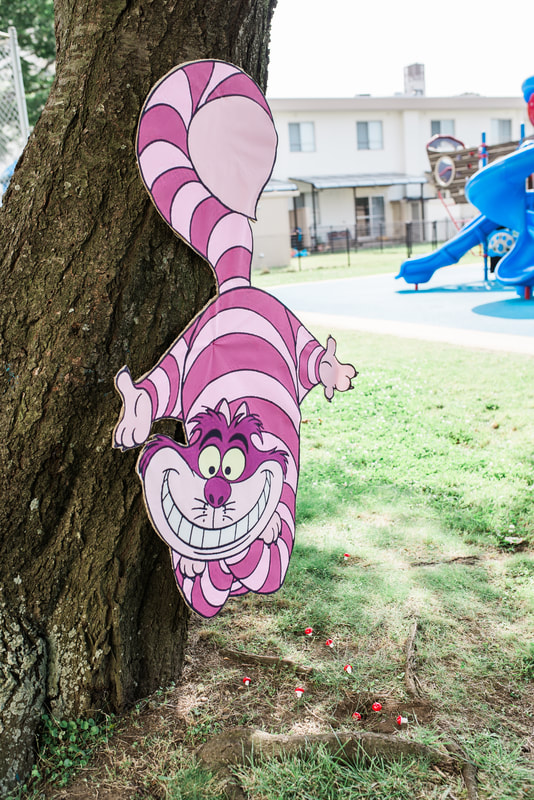
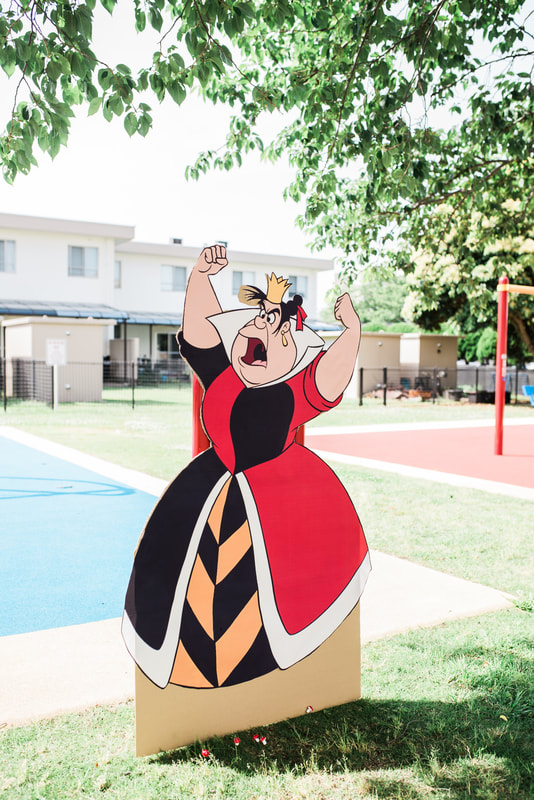
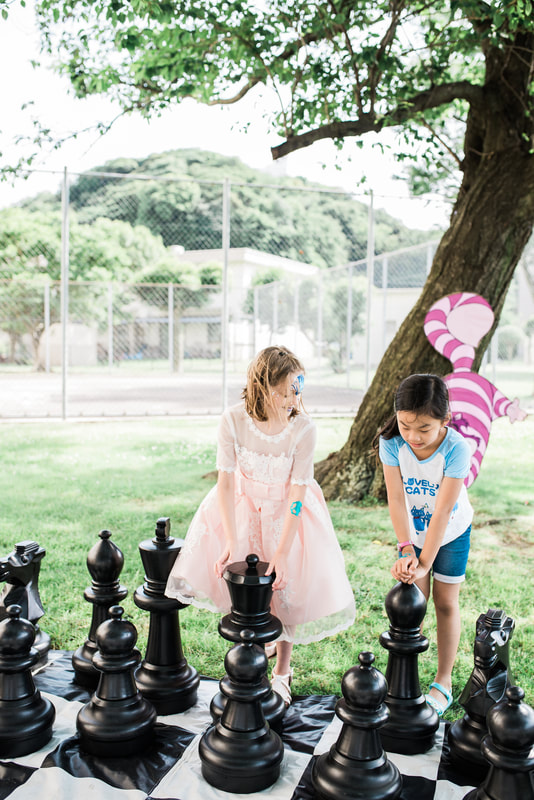
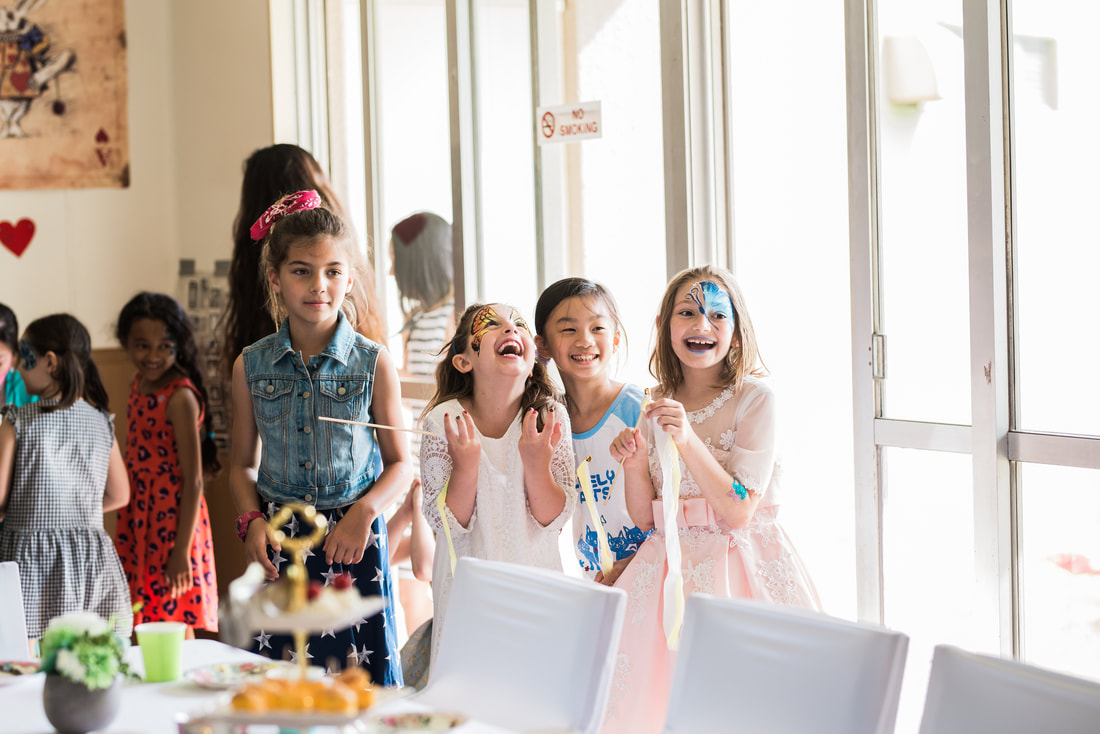
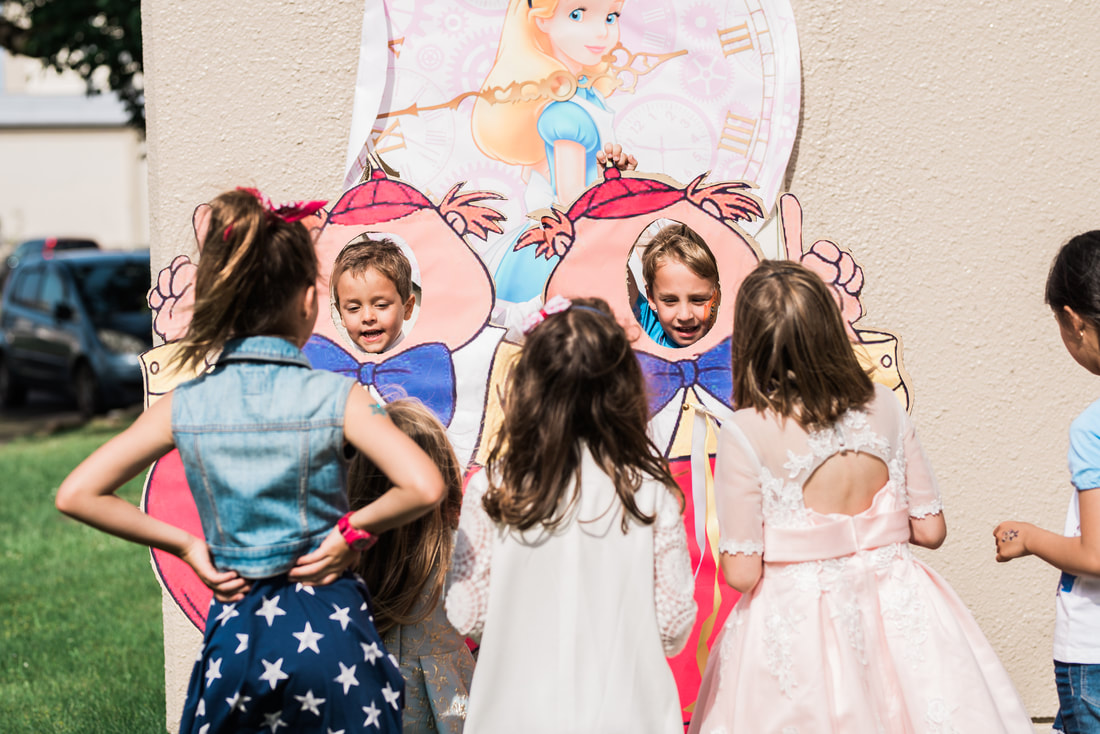
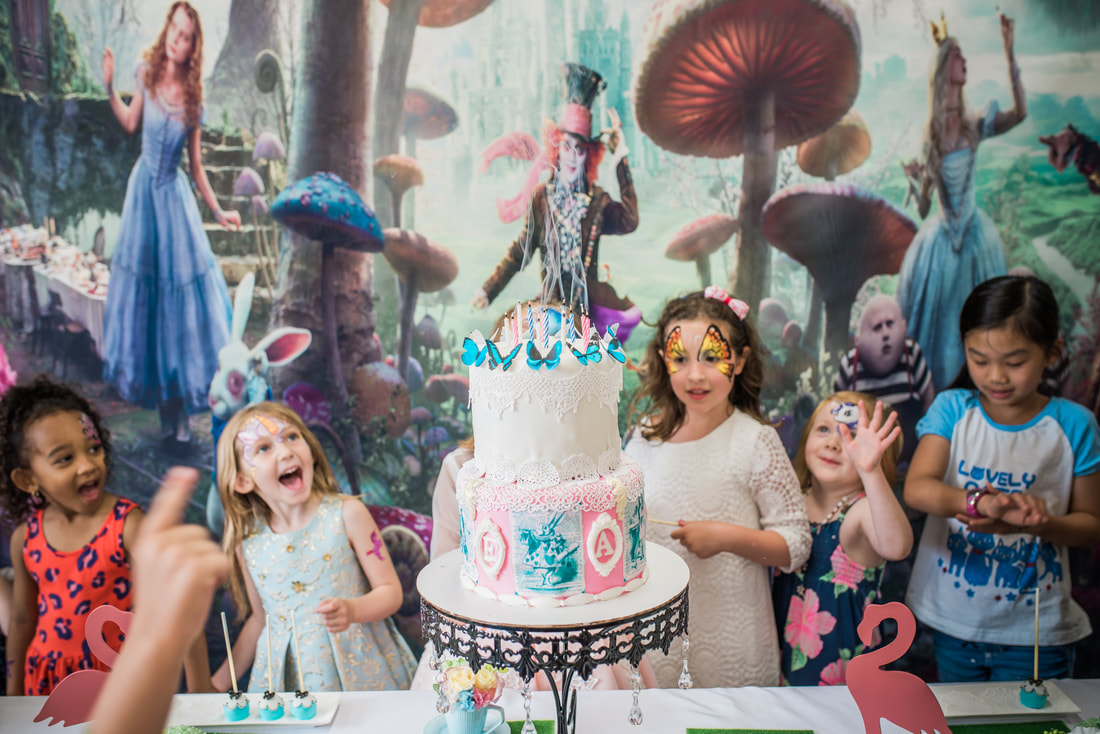
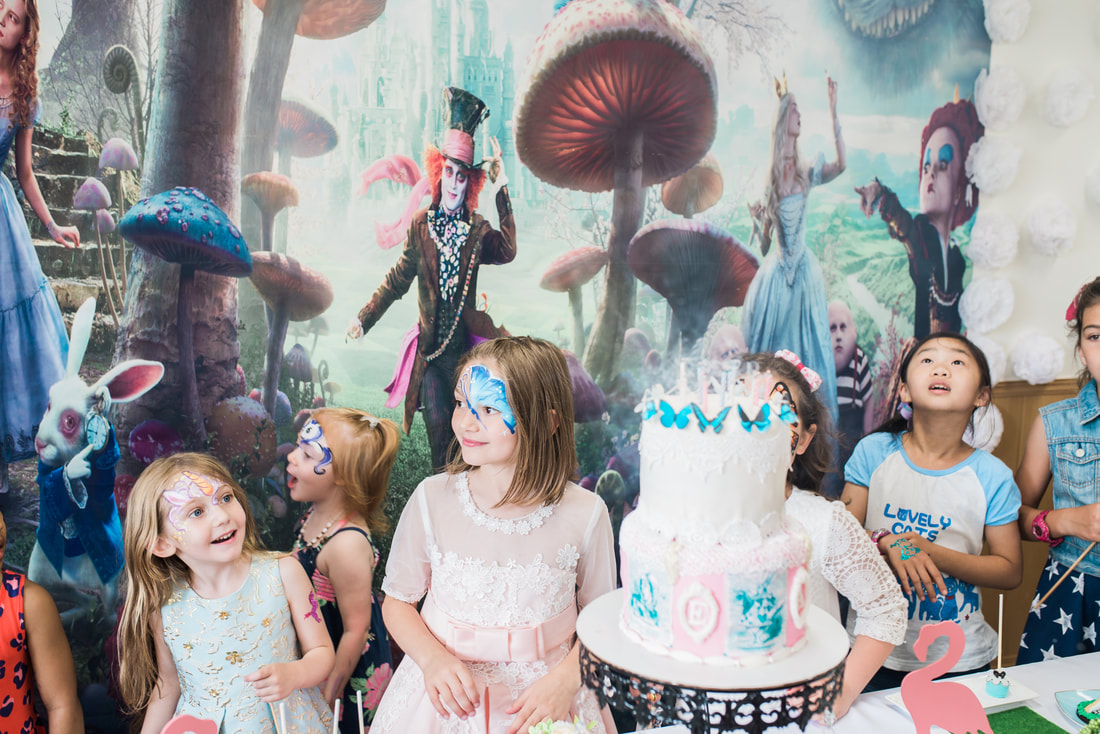
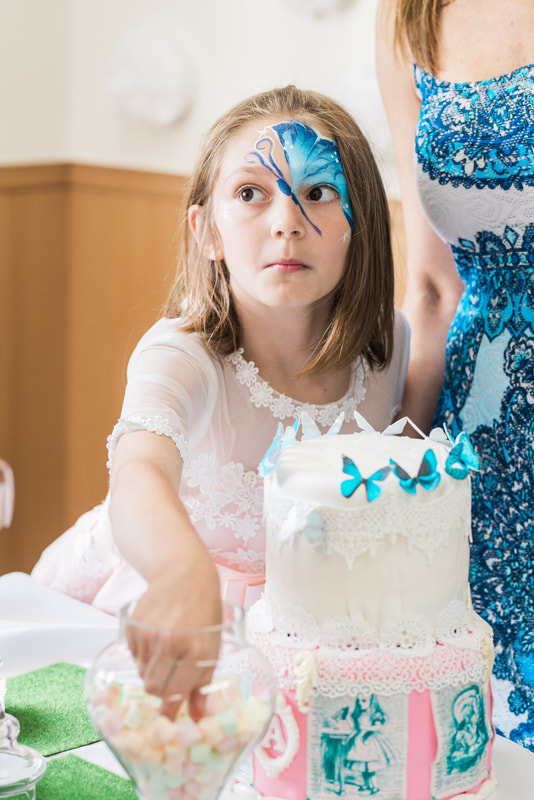
 Cookie decorating is one of the oldest holiday traditions out there. However, it has expanded past the holidays and evolved into an art form all its own. We are seeing all kinds of decorated cookies out there, for Easter, Valentine’s Day, July 4th, and so much more. They are even being seen as treats and favors at celebrations like birthdays, baby showers and even weddings! It is a skill that can be used all year-round. Do I Need Experience? Learning to decorate your own cookies is something that is very easy to learn! There is no experience needed! In just one of my three-hour classes, you will walk out with a newfound confidence that you can decorate your very own cookies. Family and friends will be asking you where you learned to create such beautiful cookies! Is It Costly To Learn? Not at all! You will not have to worry about attending multiple classes at some campus or an intimidating kitchen. At only $45 per class for beginners and $25 for returning clients, it is a wonderful investment to learn about the art of cookie decorating. Just think about all you can do with that cookie decorating knowledge! Decorated cookies can also make beautiful handmade gifts for all occasions! Was It Hard For You To Learn? For most of my life, I worked in the technology industry, and I was in front of a computer. I had never thought about cookie decorating before. I decided to take the leap in 2010 and take my first class. I was so surprised at how easy it was! Over the course of the past ten years, I have been learning and collecting different techniques from all over the world. I took classes in the USA, Japan, Taiwan, and China as well as a number of online classes in Europe. What Is Your Teaching Method? Within the past ten years of collecting different techniques, I have combined all my knowledge and simplified it to teach you how you can make a beautiful, delicate and incredibly detailed cookie in only three hours! I began teaching The Art Of Cookie Decorating in February 2016. Over the last three years alone, I have taught over 2,000 people! I started teaching at my home and over the last three years, I have made the leap to teaching at some of the most prestigious clubs and schools within the Tokyo area! Creating a beautiful cookie design that is all your own is totally possible. Imagine all of the possibilities that could arise when you make the leap into learning cookie decorating! If you are interested in learning more, please visit my website at www.Kurabiiki.com and feel free to contact me if you have any questions! There is something comforting about enjoying a delicious cookie. They are sweet and satisfying and let’s face it, even Santa Claus loves them! Everyone has a favorite kind of cookie. The best kinds are the ones that are made with love. When you decorate a cookie, you are doing just that, putting your heart and soul into making that cookie. 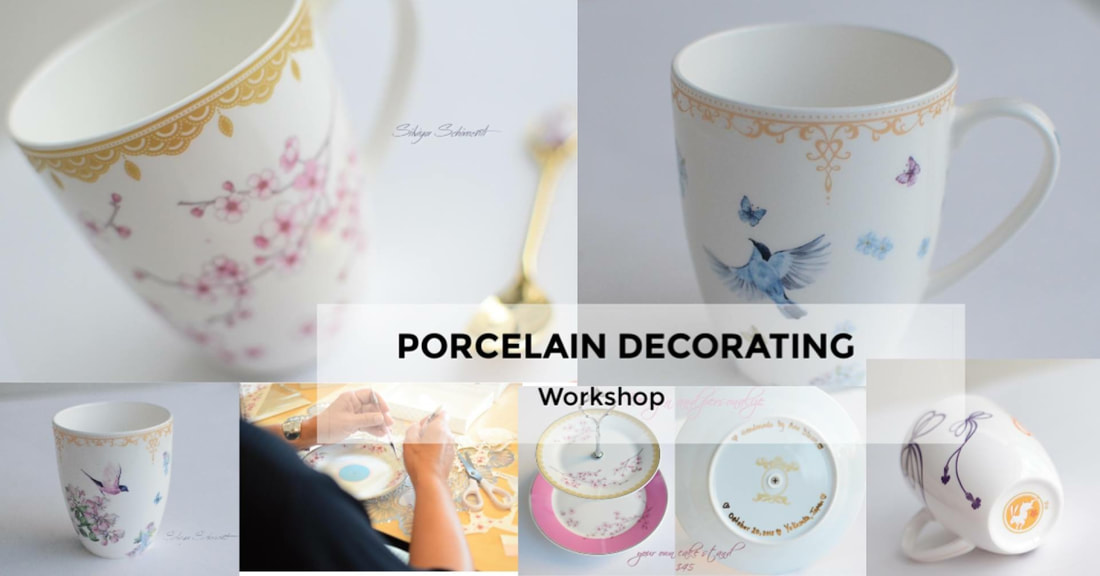 The world of gift-giving can be an interesting one to navigate, for certain. It can be pretty hard sometimes trying to find just the right gift for someone. Not to mention, what can you even find for the person who has everything that you’ve thought of already? It also depends on who you are buying for, and the occasion. Sure, there are gift guides everywhere we look online. It is tempting to simply purchase off one of those. But when you want to make it special, a gift that they will truly cherish for years to come? That is where personalized gifts can come in. Why Personalized Gifts? There is something inherently special about receiving something that is personalized. Not only was it made specifically with that special person in mind, but it shows that you put real thought into the gift that you are giving them. You form a special connection when you give a personalized gift, a gift that touches their heart. What Occasions Are Appropriate For A Personalized Gift? Without a doubt, almost any occasion is the perfect one for giving a personalized gift. Does your mom have a birthday coming up? A great idea for her would be a personalized teacup where she can enjoy her favorite hot beverage. How about if your best friend is getting married next month and you still don’t know what to get the happy couple? A personalized cutting board with their last name on it would make a spectacular gift that would be well received! Other occasions that are appropriate for personalized gifts include Christmas, Easter, a baby shower, and more! What Kind Of Personalized Gift Should I Get? They say that the best kind of gift to receive is the one that you make yourself. Handmaking a gift yourself makes that gift even more special than before because you put your time and heart into creating it. I offer porcelain decorating classes where you can handmake your very own gift. From teapots and serving trays to dinnerware and bowls, you yourself can make a beautiful personalized porcelain gift for any occasion. Our Porcelain Decorating Classes Here at Kurabiiki, we offer porcelain decorating classes, where I will teach you the art of porcelain decorating. It is something that I fell in love with doing, and I hope that you will, too! Not only is it easy to decorate your own piece of porcelain, but it is fun, too! You will walk out with not only a gift for someone special, but also the gift of how to create your own porcelain pieces! Everything that we make is dishwasher safe and is able to be used on a daily basis. If you would like more information on how to attend one of our porcelain decorating classes, please send me a message on my website and I will get back to you as soon as possible! Don’t forget to follow Kurabiiki’s adventures on our Facebook and Instagram pages, where you can see just some of the amazing pieces that my students have created! 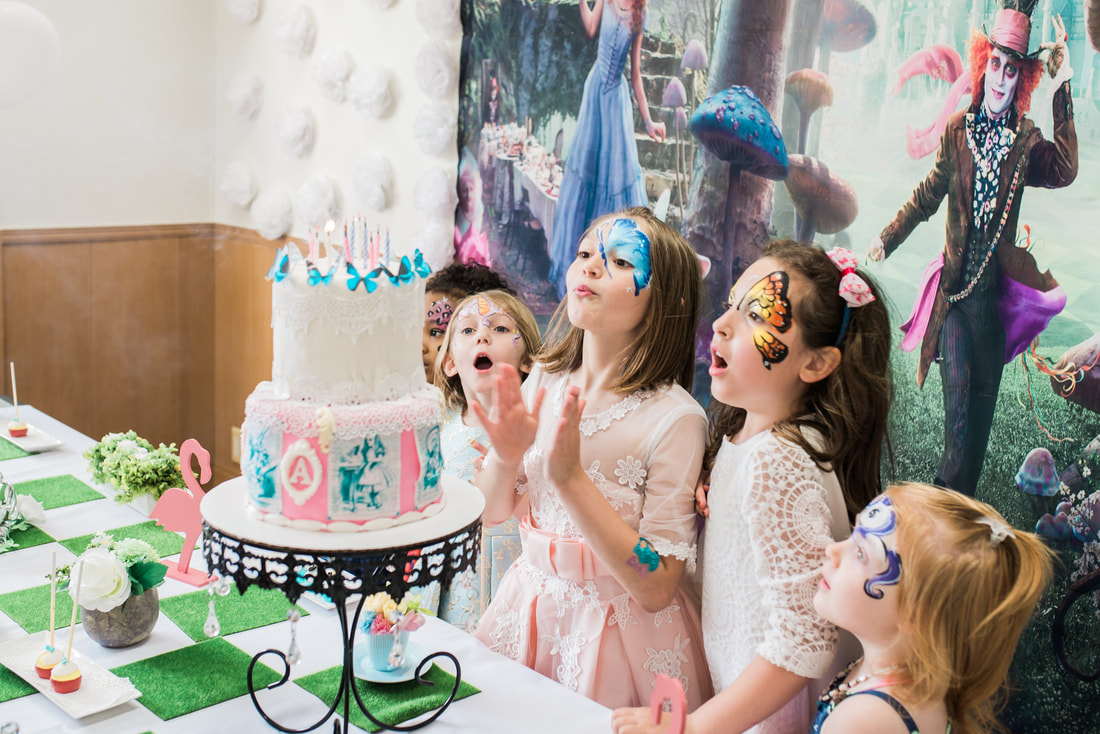 I cannot believe I’ve been postponing to share our daughter’s birthday party for over six months! Last year Elizabeth turned eight and Anastasia five. Both of our little ones are heavily into Alice In Wonderland, so the theme was a total no-brainer! We had decided on one joint birthday party for both of them, because as military families move around every two to three years, we wanted both girls to be able to celebrate with their respective friends before they said their friends moved away. Sadly, there were a few friends that had to leave before the celebration, but the girls made them a beautiful keepsake – porcelain plates, hand decorated. The party was a blast to plan! From a giant chess set outdoors, to Tweedledum and Tweedledee photo fun, to face painting, everything was Alice themed! Every wall in the room was adorned with posters from Alice In Wonderland. The backdrop for this party was probably the largest one I’ve worked with so far! I think that the hardest part about putting everything together were the giant cutouts! I sent them out to a professional printer, and then cut them out and glued them to cardboard sheets! For the Tweedledum and Tweedledee posters, I had the faces cut out, so the children could stick their faces in them for a fun photo opportunity! Even the treats were Alice themed! I created Alice themed cookies and cake pops, and of course, the cake! On the dessert table, we also had marshmallows and chocolate covered raisins. The main table was covered with a white table cloth, and matching white chair covers. We had mini croissants, quiche, and Pavlova, which is a dessert made with crisp white meringue layers filled with fresh fruit and whipped cream, it is named after Russian ballerina Anna Pavlova. A separate table held held light snacks such as tea sandwiches, fruit, and vegetables for our guests. Elizabeth had received a children’s camera for her birthday, so she enjoyed being a miniature photographer, snapping pictures of the party and her friends! There was a big playground outside the venue, so our party guests could play and enjoy themselves on that, before relaxing to a game of giant chess! And of course, I have to give credit to our wonderful photographer, Saori Wilson, who captured the magic and joy of the girl’s special day in a beautiful way. It was certainly a whimsically wonderful day for both of our girls and their guests, and will definitely be a birthday party that they remember for years to come. Hello, everyone! I know it’s been a long time, but I am very excited to start teaching again! I have some wonderful news – starting in October, I will be offering up not only one, but four different types of classes for you to enjoy! Check them out and join one! 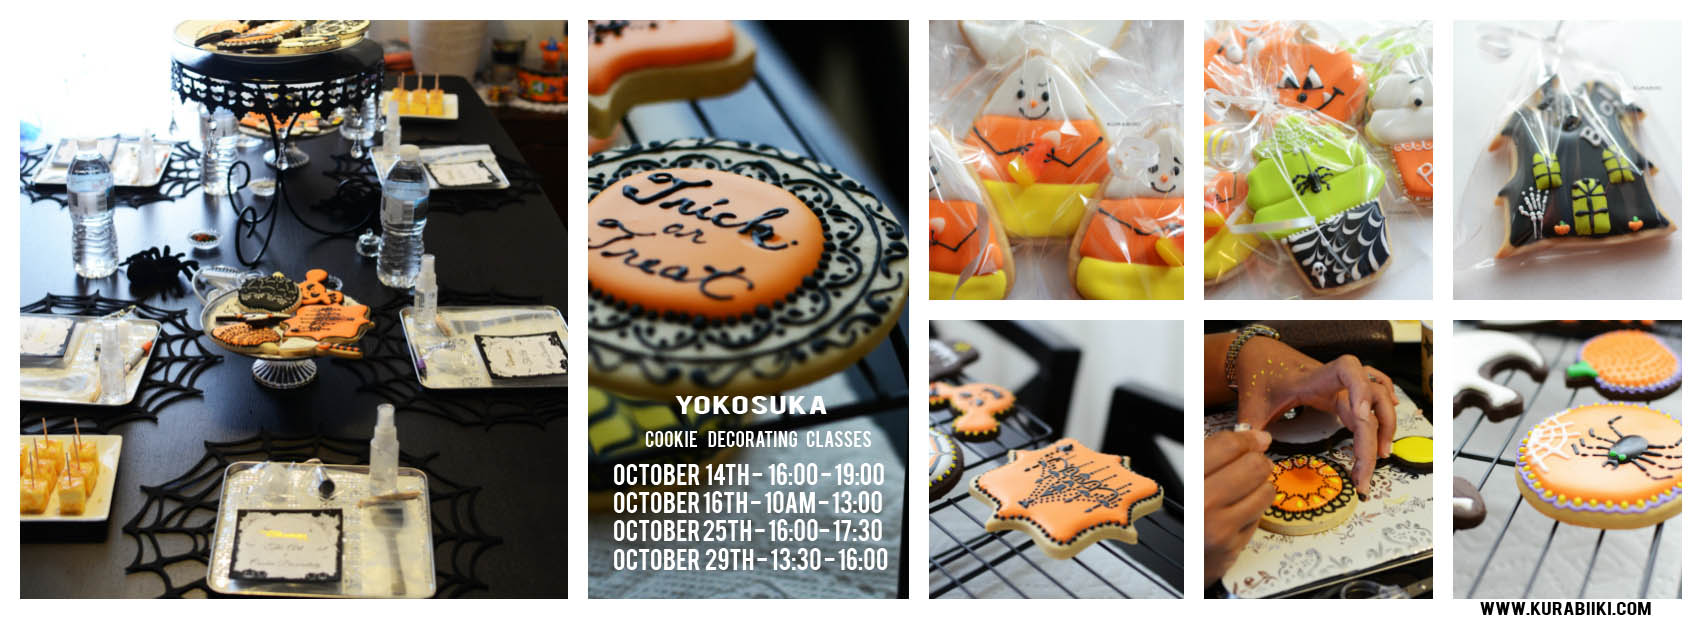 The Art Of Cookie Decorating - $45 – 3 – 3.5 hours.
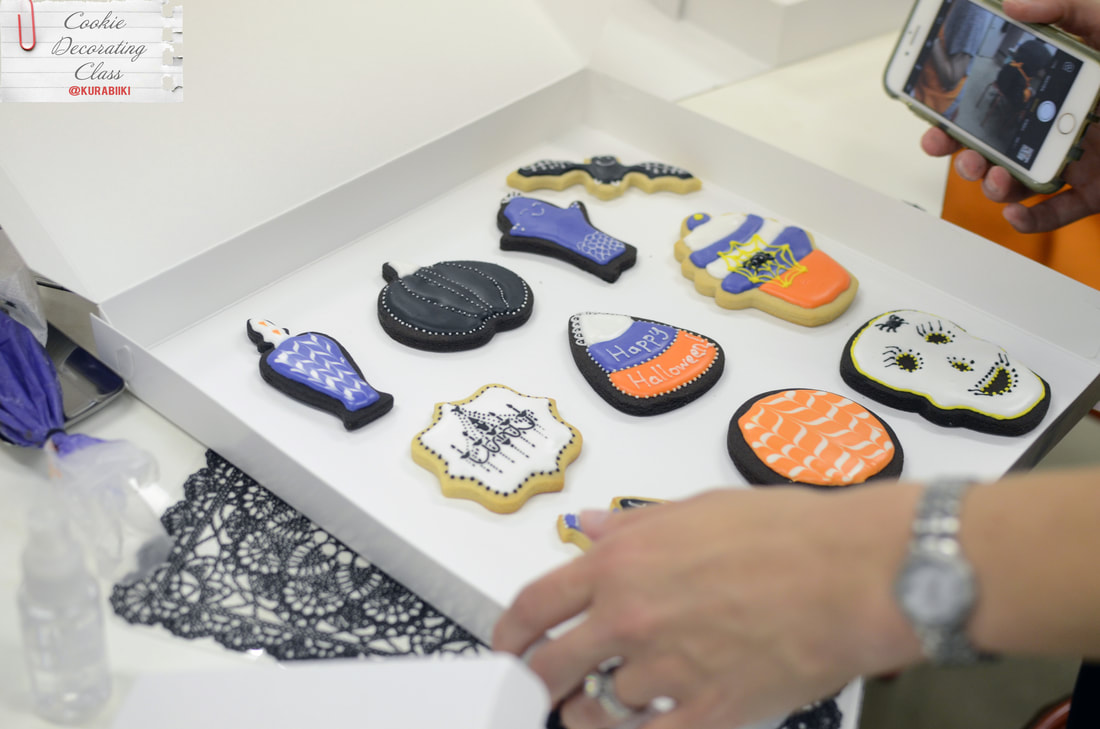
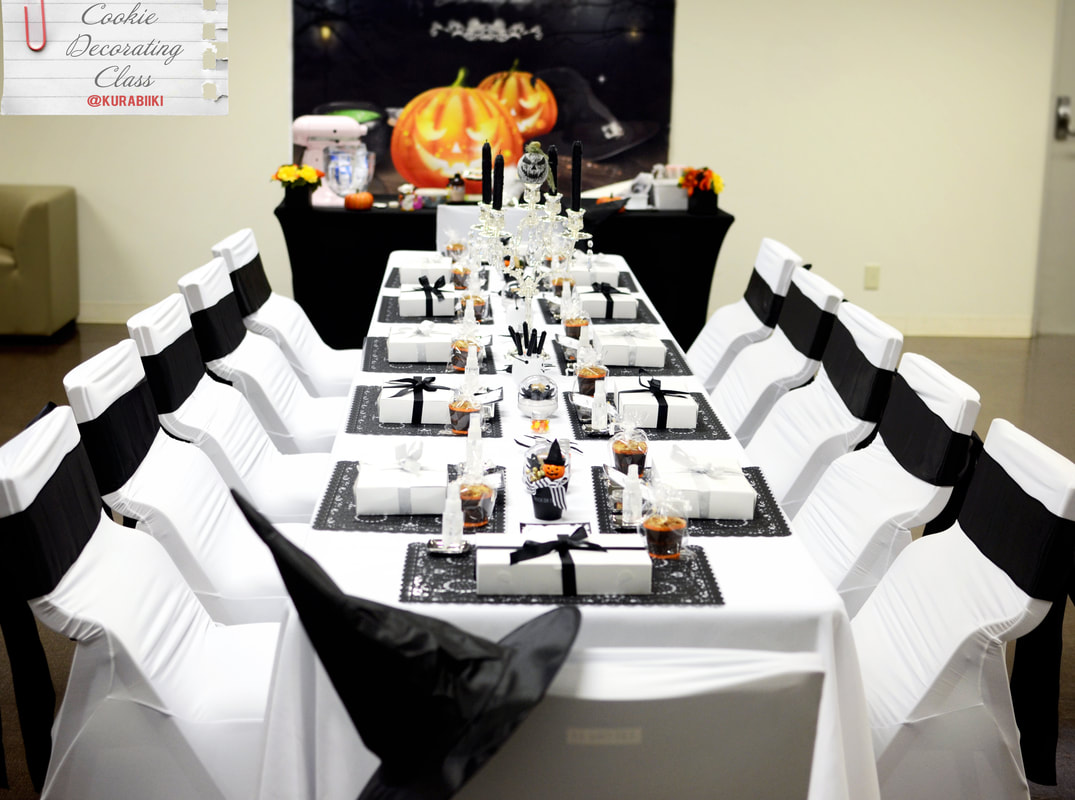
(Yokosuka - October 14th & 16th & Tokyo - October 27th) This is your basic cookie decorating class. Here is where you will learn how to bake magnificent sugar cookies, create the right consistency of icing, how to outline and flood a cookie, and of course how to create incredible detailed designs! With you, I share my fail-proof recipes for both chocolate and vanilla sugar cookies, alongside tricks and tips that I have learned over the past six years. By the time you are finished with my class, you will have all the tools and knowledge to create stunning cookie designs for any and all occasions! No baking or decorating experience is necessary to join! You will learn all you need to know in this class! Decorating Basics and Techniques - $35 – 2 Hours (recommended for team building and company events) This is a decorating only class. Icing and cookies and pre-colored icing will be provided to you. During class, I will cover all the basics of cookie decorating techniques – flooding, outlining, wet-on-wet designs and layering, even as well as a few advanced techniques such as stenciling, royal icing transfers and more! Samples will be available that will match the class theme. You may follow the samples or relax and let your imagination take you away and create your own artistic masterpiece! This class is recommended for experienced bakers or for participants who are looking for more fun, rather than a learning experience. This is the perfect team building exercise, especially for company events! Cookie Decorating Parties - $25 (Yokosuka - October 29th) This class is only open to participants who have taken my basic The Art of Cookie Decorating Class. Cookie decorating classes are usually held within a week before Valentine’s Day, Easter, Mother’s Day, Halloween and Christmas. Once you have taken the basic class, you are able to attend an unlimited number of Cookie Decorating Parties. Kids Cookie Decorating Class - $15 per Child (Yokosuka - October 25th) This class is recommended for children five years and older. You could either stay with your children or drop them off for a grand old time of fun and cookie decorating! This is an educating and stimulating experience, as well as a ton of fun for them! We won’t be covering baking, but your littles will learn all of the basic decorating techniques! As always, please send me a note if you have any questions or if you are interested in hosting a private party. I do have different packages for events and classes outside Yokosuka, Japan. ~Silviya 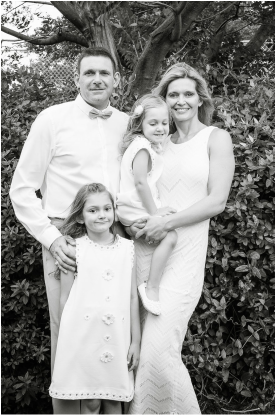 My name is Silviya Schimenti, and I am a proud born and raised Bulgarian, which is where Kurabiiki gets it's name from, as it means “cookie” in Bulgarian. After spending over ten years within the geospatial industry, I gave up my career in 2010 to become a stay at home mom. While the transition wasn't easy, it did help me to explore other avenues and it opened up doors to opportunities that I had never had the option of exploring before then.
I started decorating cookies in 2010 and became obsessed with it. It was my way to relax, unwind and recharge. A few months later, I turned this newfound hobby into a business. After offering custom cookies for approximately four years, I started teaching The Art Of Cookie Decorating in the beginning of 2014. I do truly believe that there is an artist deep down in every one of us, we’ve just yet to discover it! That’s where Kurabiiki comes in, to give you the platform to explore your own talents and create masterpieces! My goal is to help women forget their busy life and to enjoy and explore the world of art. I strive to make my classes unique and special. I have different themes every month/season and I try to create beautiful and relaxing atmospheres for everyone to enjoy. My style and work is influenced by my worldwide travels. I’ve lived and worked across three different continents, Europe, North America, and Asia. Inside one of my classes you will find fun and all of my knowledge that I have found around the world and simplified it, bringing it to you, so you can create incredibly beautiful edible art. At the end of my three hour class, without any experience, you too can create amazing cookie creations! See the photos section for some of the amazing cookie art my students have created! I love teaching, not only because I enjoy meeting new people, but because I love empowering women and moms, and helping them to believe in themselves! I also enjoy styling and organizing special events, and my work has been featured in publications such as Hostess With The Mostess, Pizzaree, Style Me Pretty, and more. Typically, I teach classes and private parties in Yokosuka and Tokyo, Japan, however, in early 2017, I began to teach at the Tokyo American Club in Tokyo, Japan. The latest schedule of my Yokosuka classes can found on Kurabiiki’s Facebook page. If you are member of Tokyo-American Club, please check their website for the Fall term classes. If you would like to learn more about a cookie decorating class, plan a party of your own or have a general inquiry, please use the ‘Contact Me’ link to get in touch! 
When it comes to my little one, jewelry is always a win so when she wanted to have a “sparkly jewelry party” for her 6th, I convinced her that we could put a whole new twist on that idea with a daisy party instead, using Daisy Cookie Rings as edible jewelry! They were such a hit with the kids and the adults that I just had to share this fantastic dessert idea with you all! It is one that can easily be used for birthdays, engagements, anniversaries, favors and more.
First the Cookie Dough
To start your adventure in cookie ring making, you need cookie dough of course! This recipe is inspired by the LilaLoa's recipe and its a delicious starting point that is simple to create.
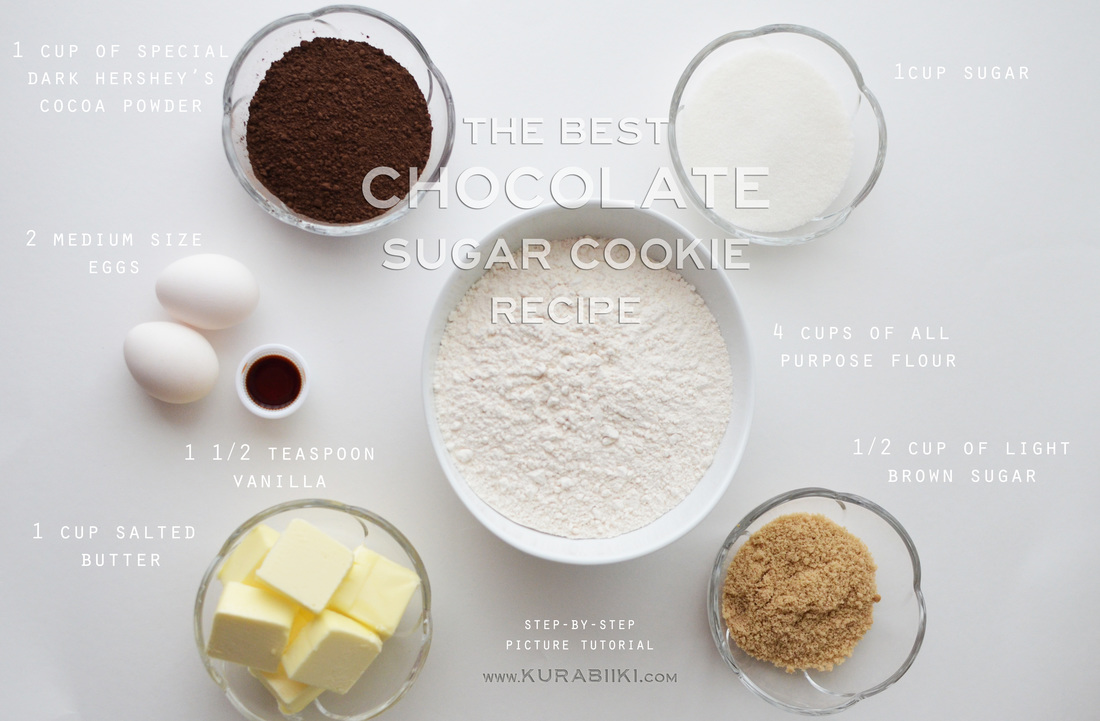
3-4Ingredients:
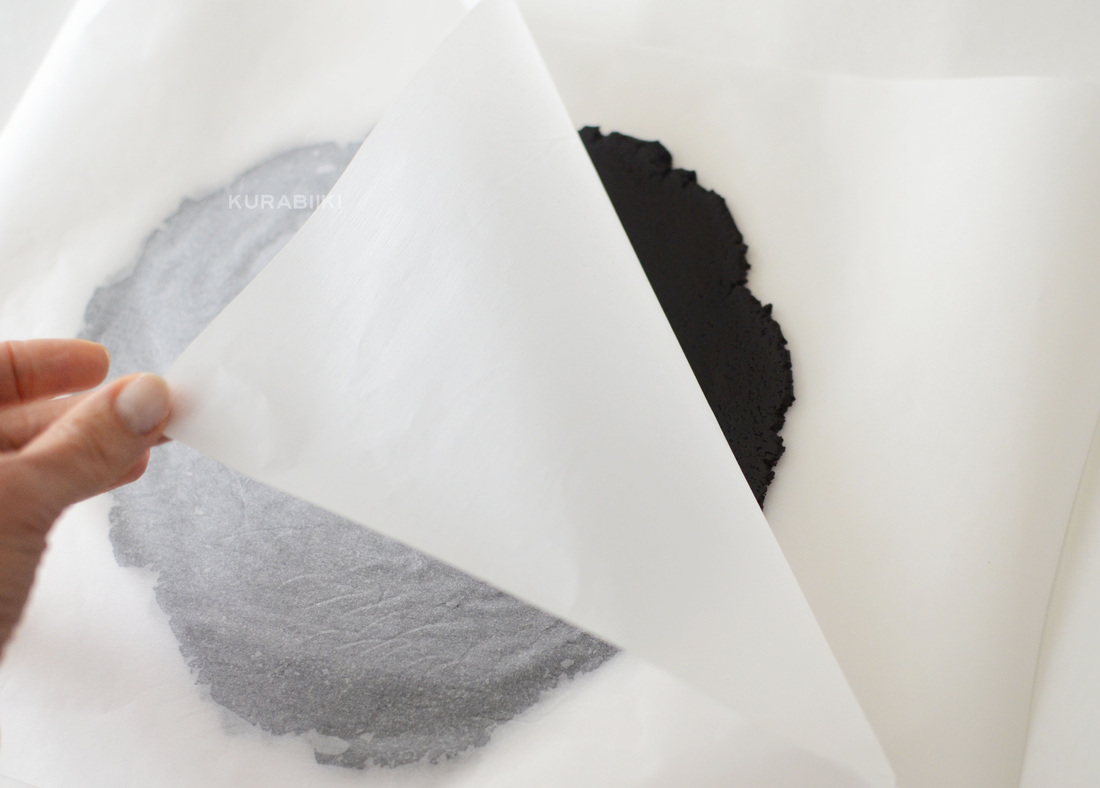
1 cup salted butter ( you can use unsalted as well, just add a pinch of salt) 1 cup white sugar ½ cup light brown sugar 2 large sized eggs (17mm) 1 ½ tsp vanilla extract 1 cup dark cocoa powder 2.5 - 3 cups all purpose flour Instructions:
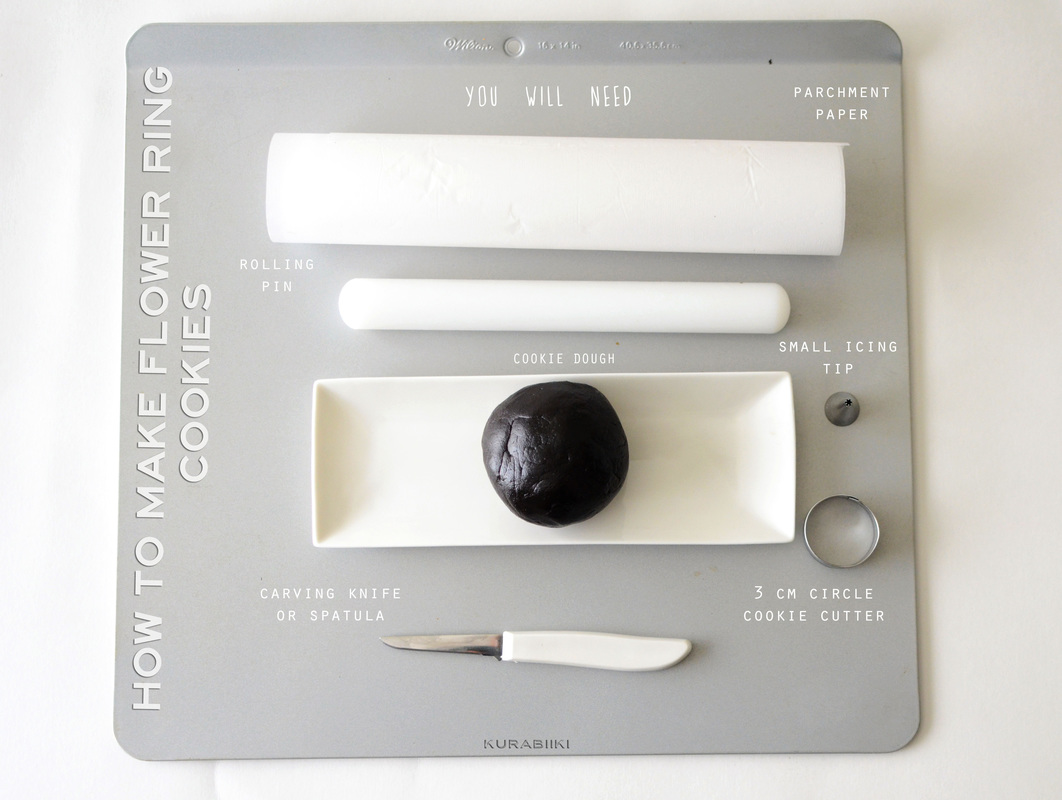
How to Make Your Flower Cookie Rings
After you have gotten your dough nice and chilled it is time to make your rings. For this part you will need your dough of course as well as a cooling rack and parchment paper (or a sil pad).
Making Cookie Rings
Items needed:
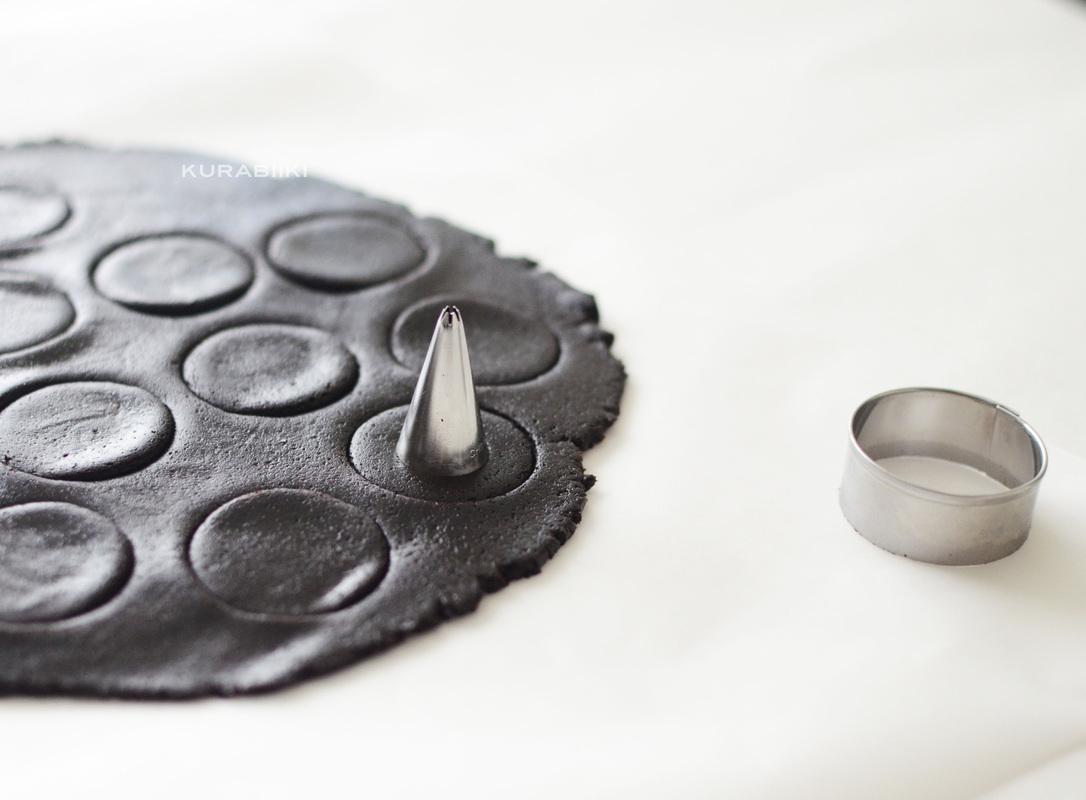
Chocolate cookie dough Cooling rack Parchment paper or sil pad 2 circle cookie cutters - 3.5 cm and 2 cm Tip: You can use your icing tip if you have a hard time finding a small circle cutter Rolling pin Cookie sheet Piping bag, coupler and Piping tip #104 - rose tip
Instructions:
Preheat the oven to 375F.
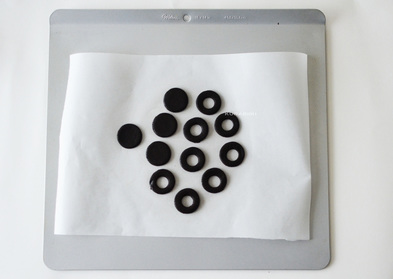
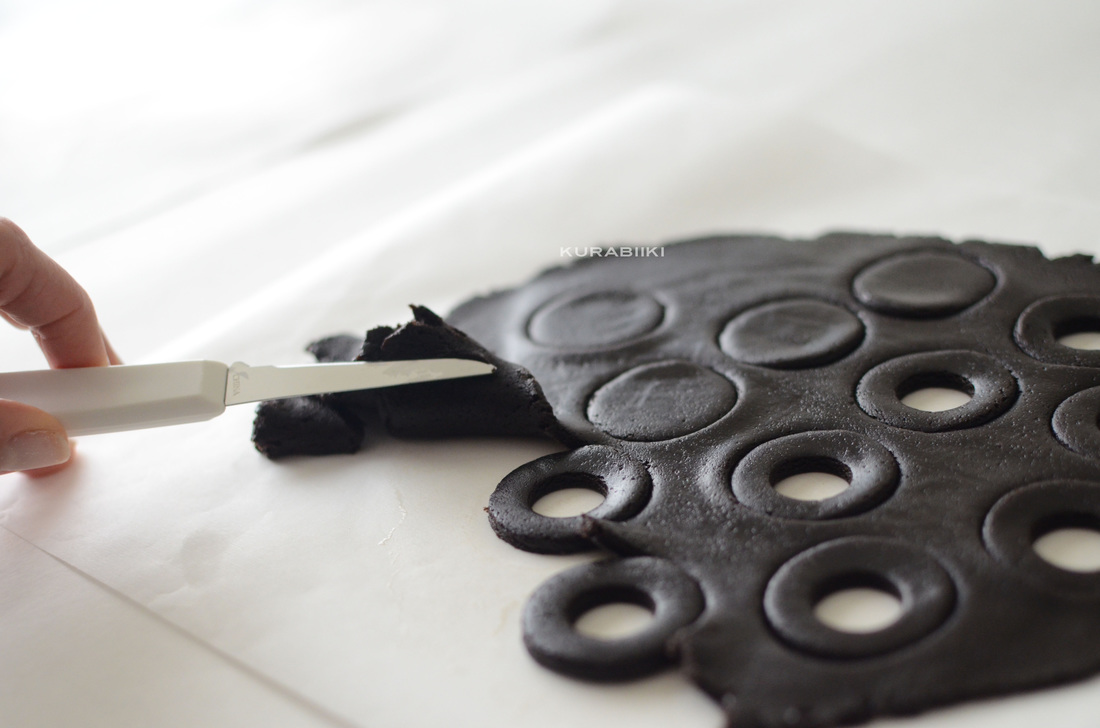
5. Cut circles out with your bigger cookie cutter, leaving just a small space in between the cookies. Cut another circle inside of the big one. This makes up the “ring” part of your cookie. You will need two ring pieces and one top for each cookie. The top is the same size as the ring, just made with one cutter and no smaller hole in the center.
6. Using a small knife or a pointed spatula, remove the extra dough from around the cookies.
7. Slide the parchment paper (or sil pad) with the cookies onto the cookie sheet and bake for about 10-13 minutes. (baking time depends on the thickness of the cookies.)
Time To Make Some Icing
In order for these cookies to become beautiful and tasty daisies, they will need some icing. In my royal icing recipe it turns out white, which is a typical daisy color of course. You can always add some food coloring to create your own flowers for your special occasion. In order to assemble the rings you will definitely need the icing so here is my Royal Icing Recipe!
How to Make Royal White Icing
Ingredients:
4 large egg whites 2 pounds of powdered sugar Instructions:
Let’s Assemble the Rings
Now for the fun part, putting together the delightful and edible treats for your party!
Instructions:
Here is a short video of how I made the cookie rings. Follow me on Instagram for more Cookie Decorating Videos, Tips, tricks, recipes and more https://www.instagram.com/kurabiiki
Questions? Comments? Leave a note here on our Facebook Page
 I was so excited when my little one wanted to have a Daisy Birthday Party this year, it allowed me to create a gorgeous layout with natural touches and sweet colors! Using white, yellow and green, I was able to give my venue a sophisticated and fun styling that I was sure Elizabeth and her friends would love.   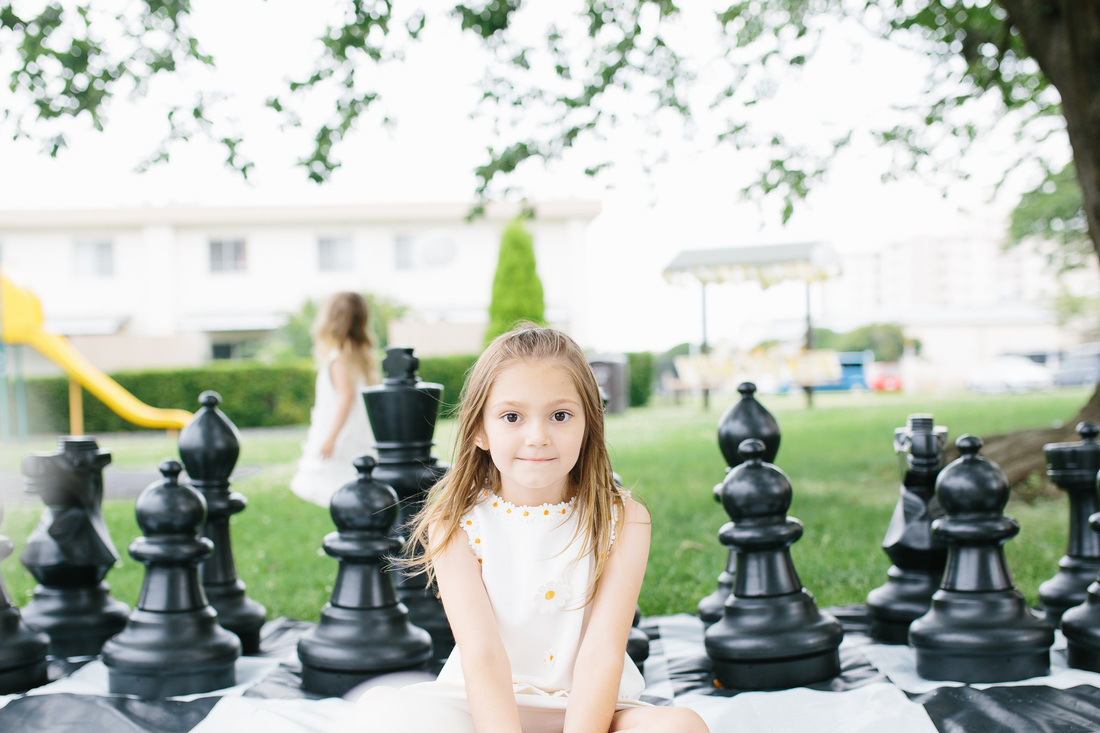 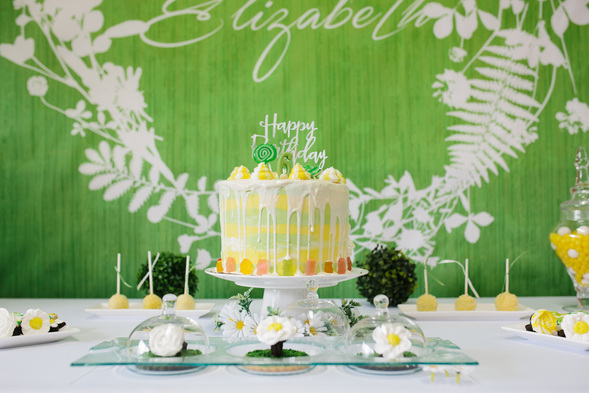 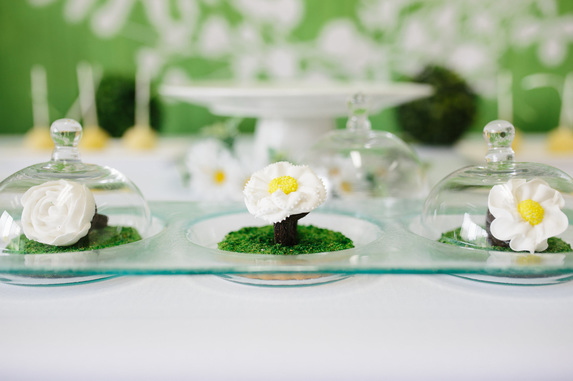  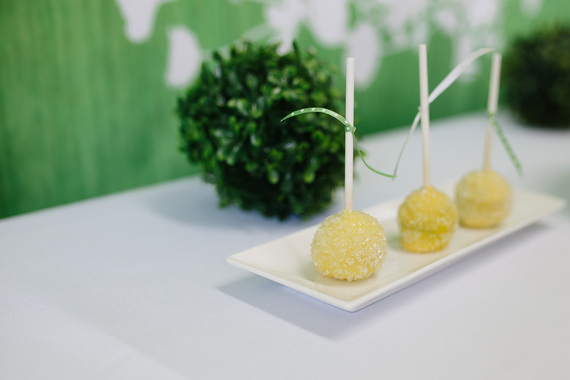 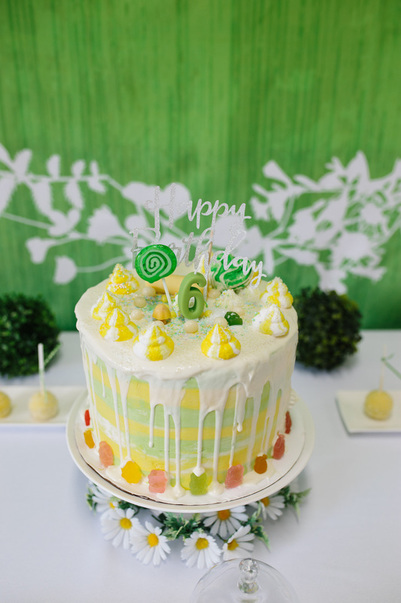 I used a stark white cover to set the stage for my sweets table, allowing the yellows and greens of the decorations and snacks to really pop. On this table I showcased the cake that I made. It was a chocolate cake with Italian meringue buttercream that was covered in white chocolate, white and yellow meringue, Italian macaron and as a finishing touch, lots of colorful gummy bears! The cake tray was then circled with a ring of daisies for a sweet effect. A favorite treat that I made were daisy rings that were such a hit that I created a tutorial that you can check out! At the guest tables, I used white again as a base, to blend with the other tables perfectly. I created adorable daisy centerpieces that stood low so the guests could easily visit while enjoying the decorations. Matching tableware added color and fun to the tables. I had white chair covers for an elegant touch. 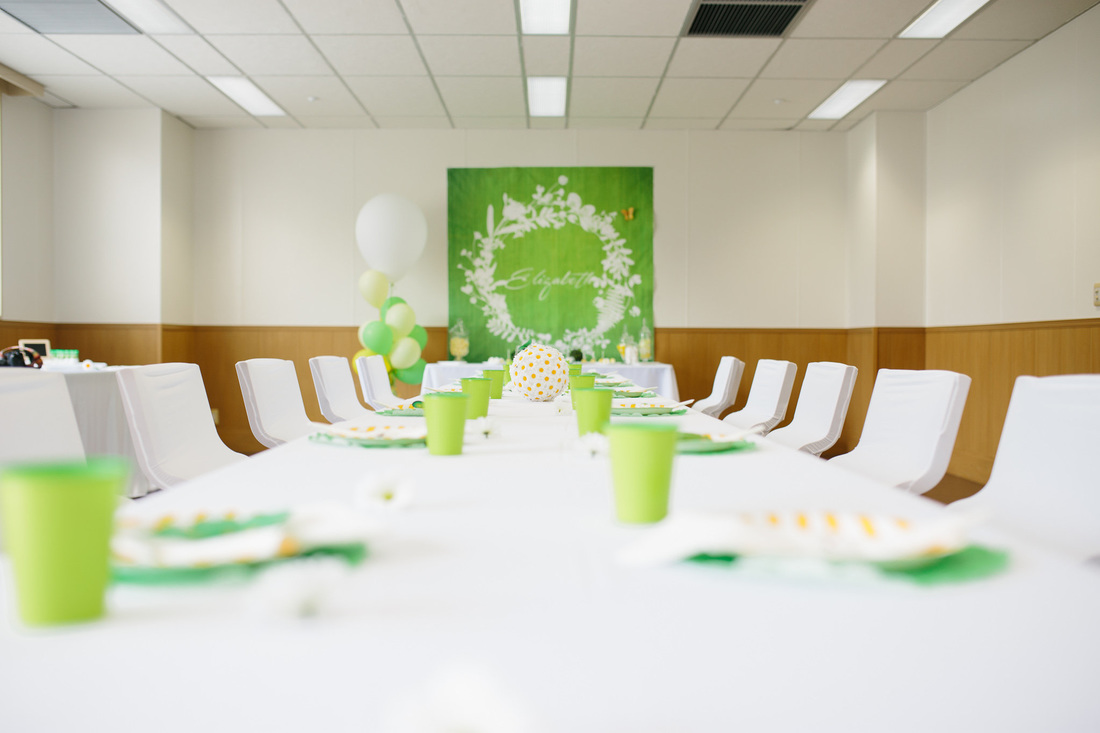 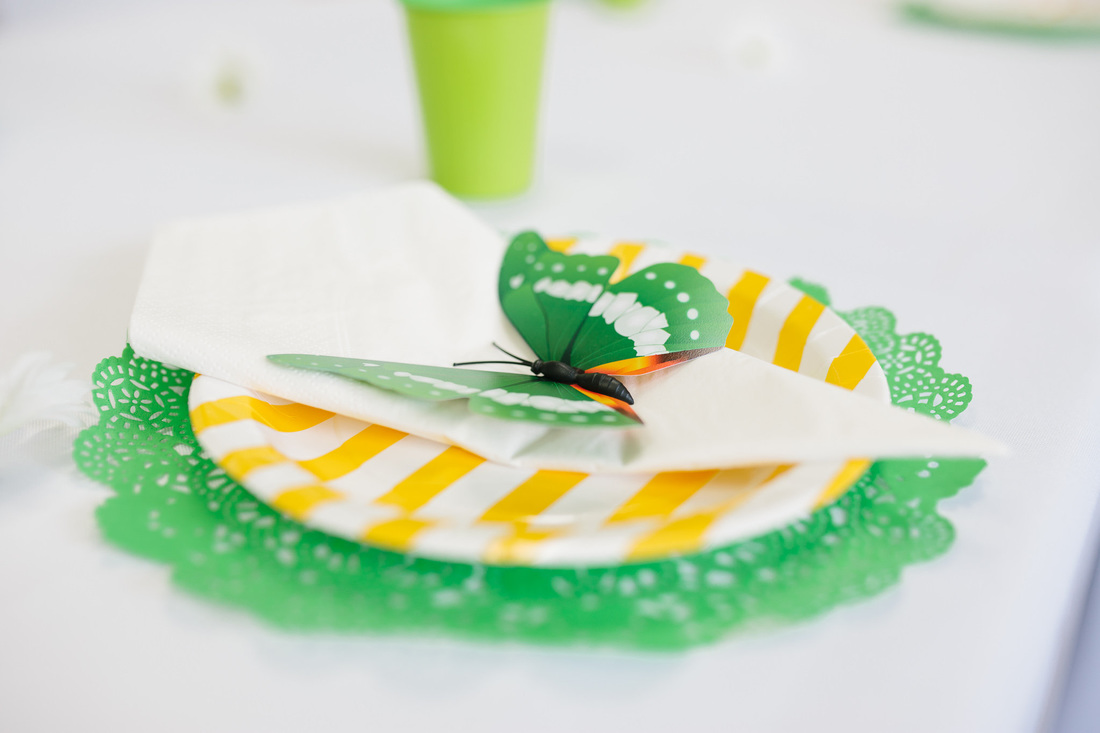 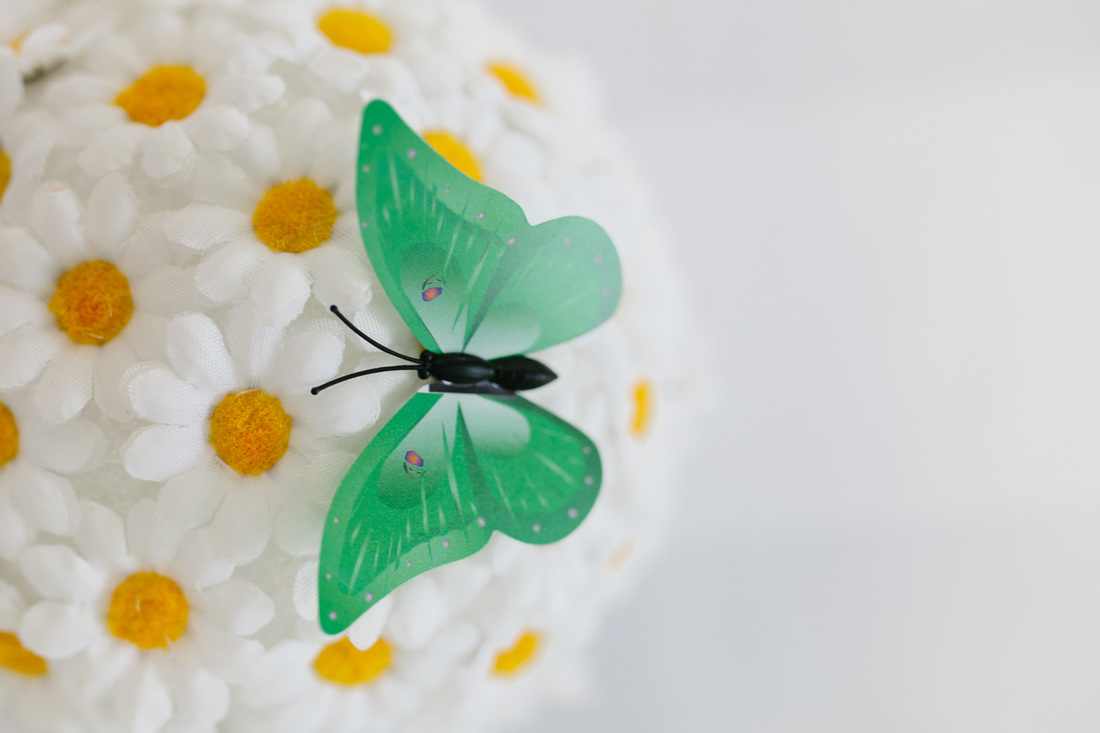 On the other side of the room, there was other snacks including fruit, vegetables, juice, a daisy shaped quiche, and of course, even daisy picks for the cheese!  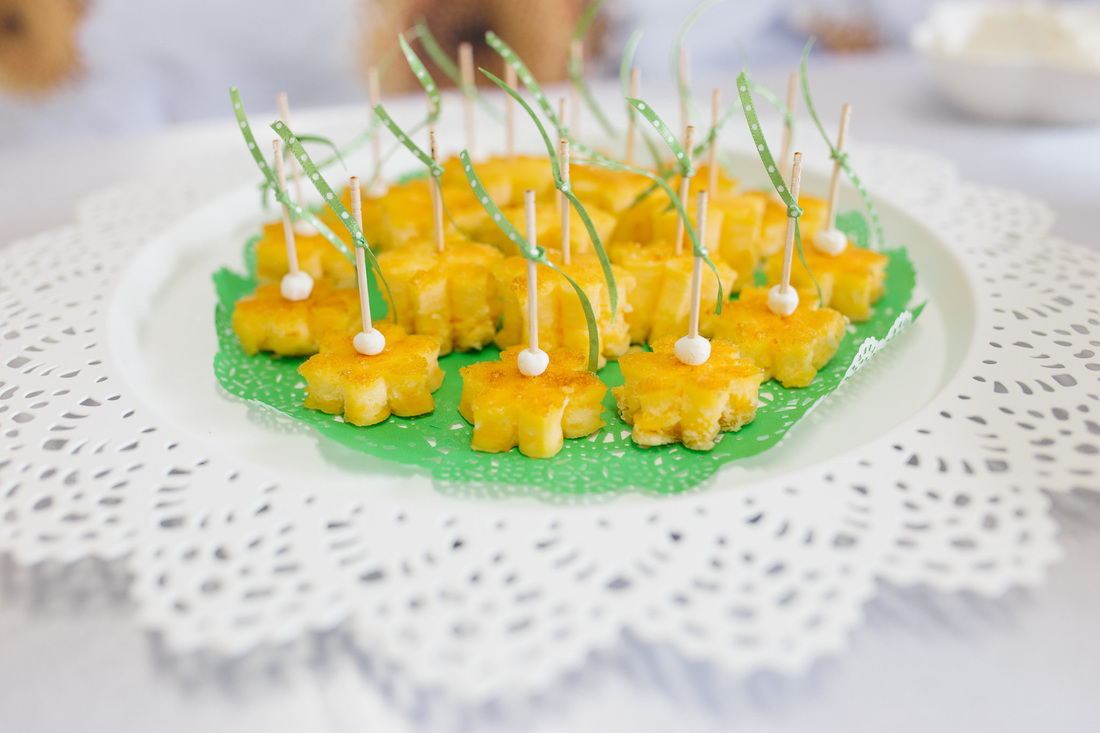 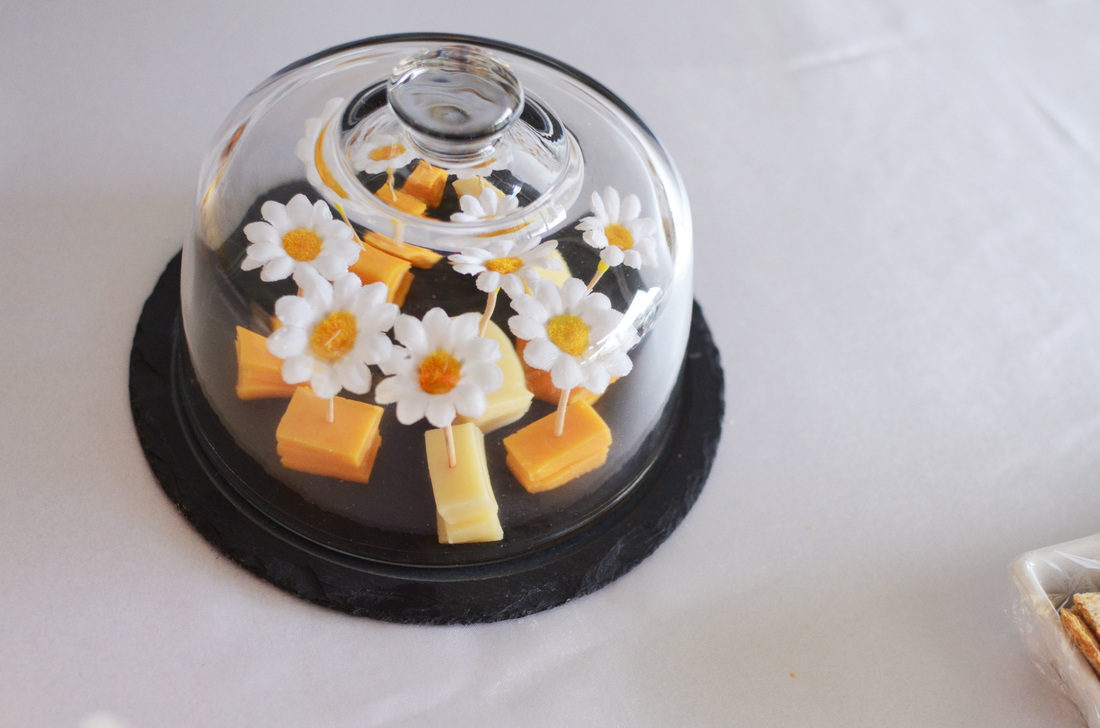 For the kids, Elizabeth had a fantastic Daisy Stand set up where her pals could get daisy headbands and green bow ties as well as lace ribbon wands to allow everyone to match the theme in a creative way. 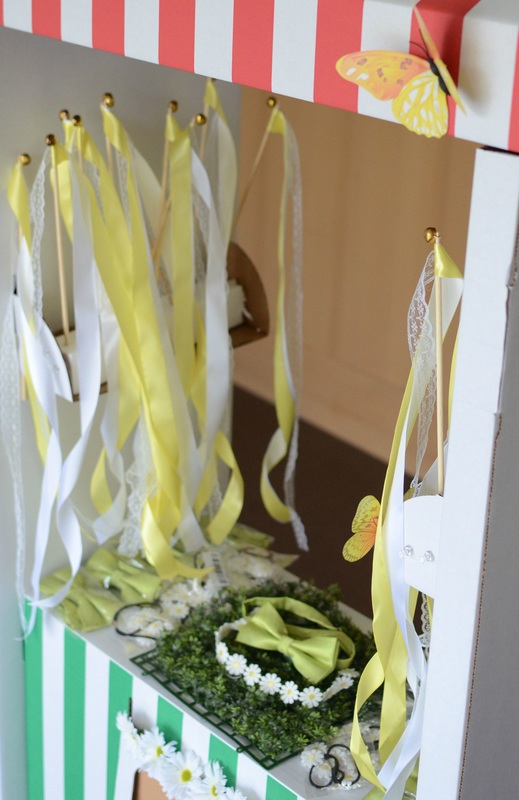 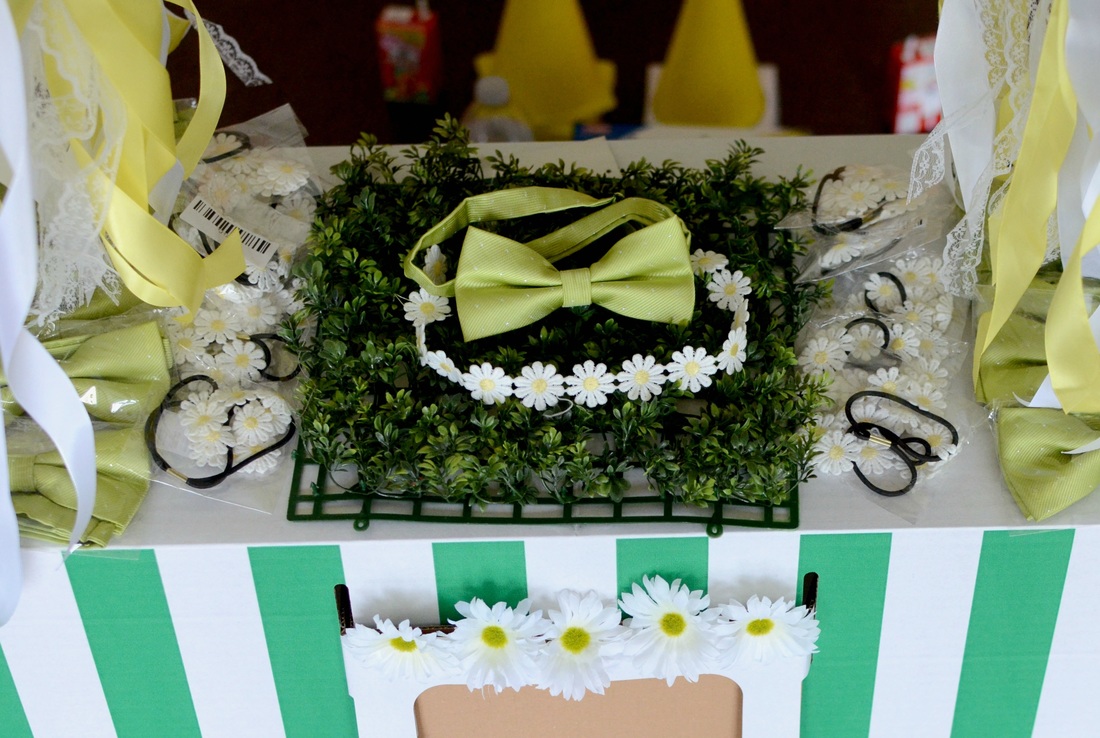 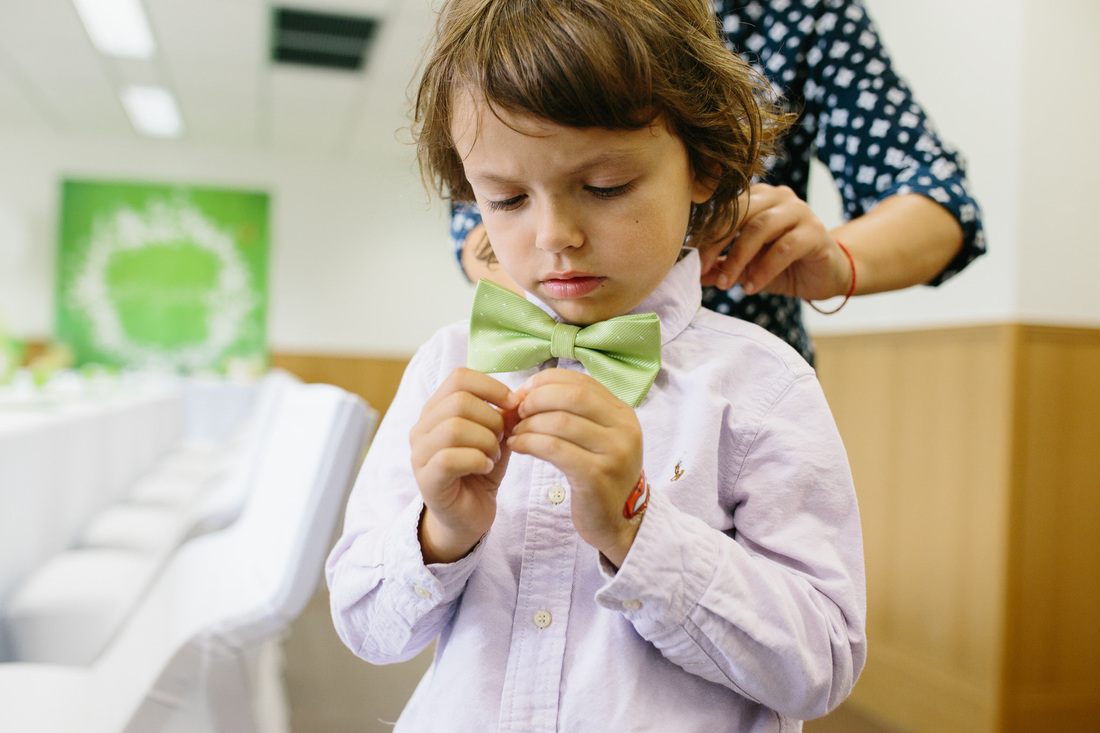 She even had her own special lemonade stand outside for all the little ones to enjoy. Other activities that they got to participate in included giant chess, croquet, ring toss and an adorable little tea party tent.  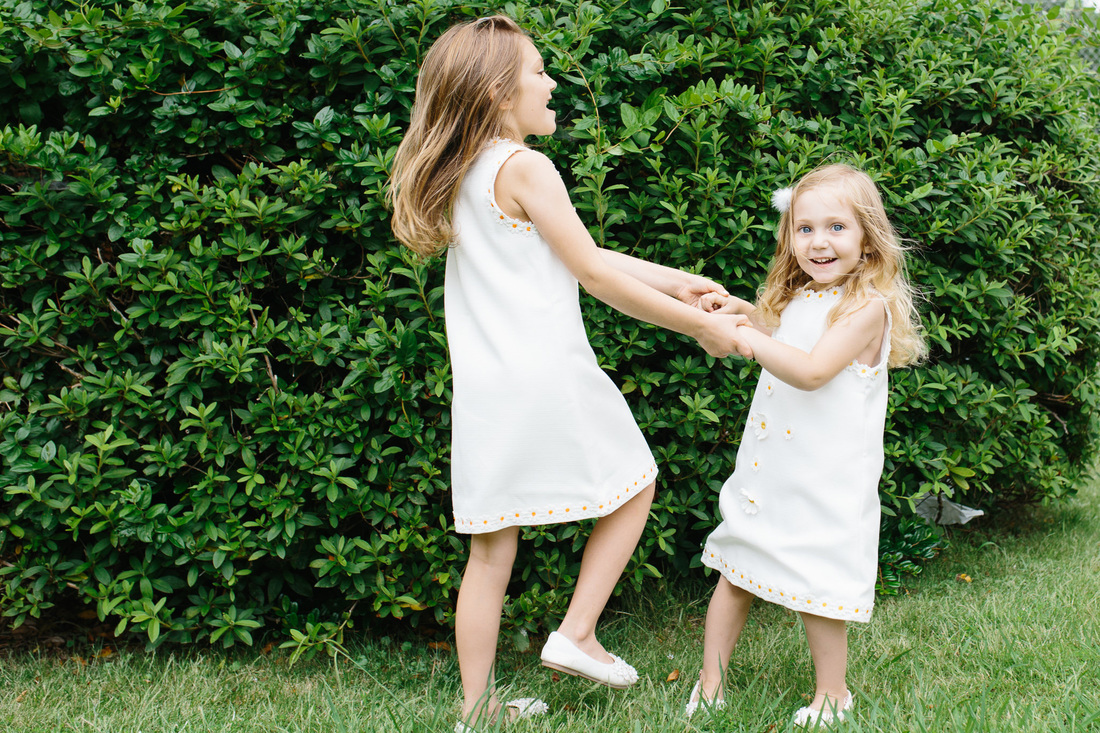 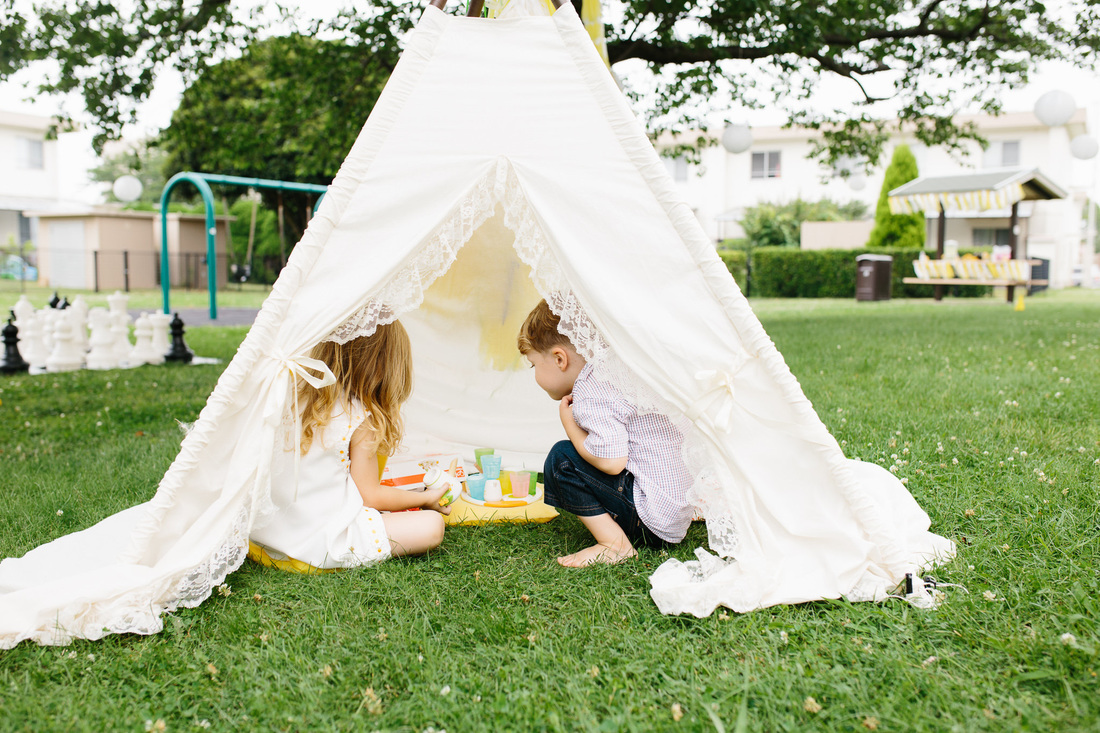 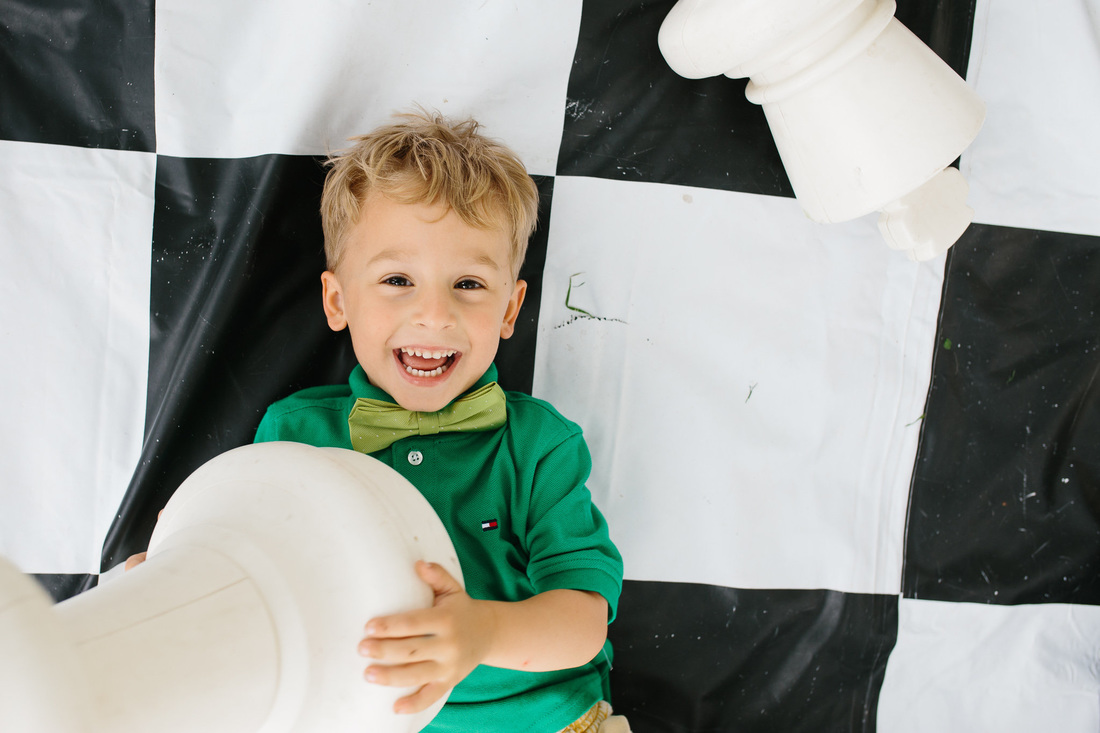 To thank the guests for coming I put together favors which had copies of “A Secret Garden” coloring books, colored pencils and a packet of daisy seeds with “Forget Me Not” printed on them. 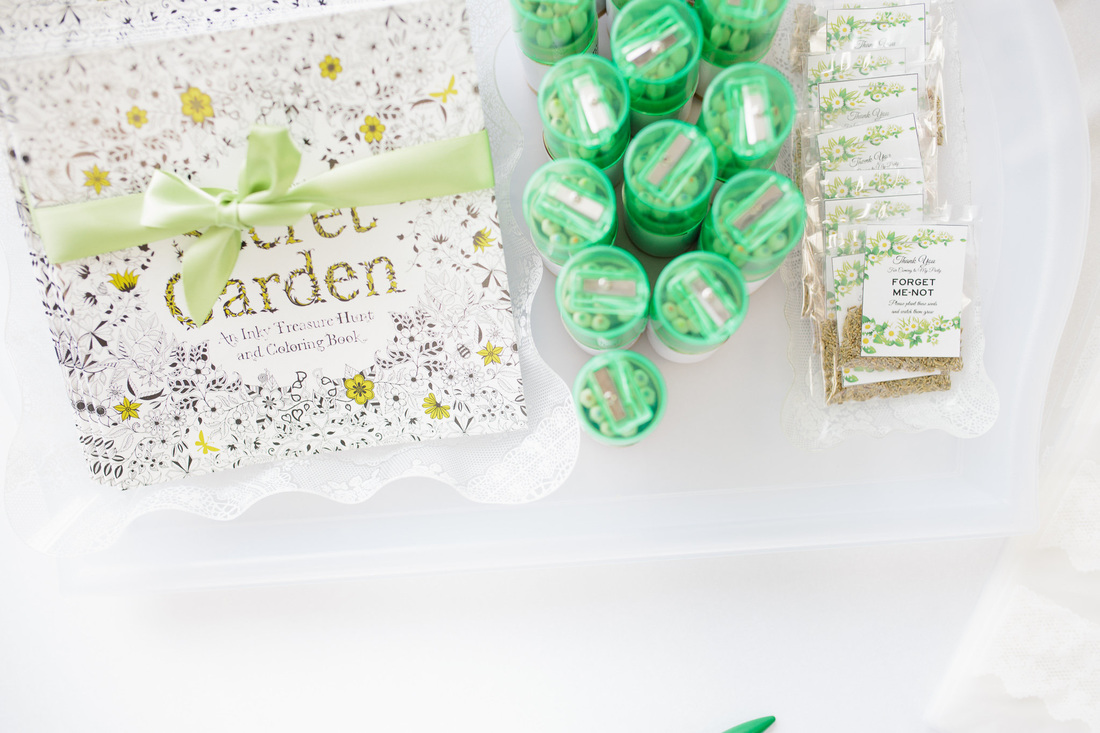 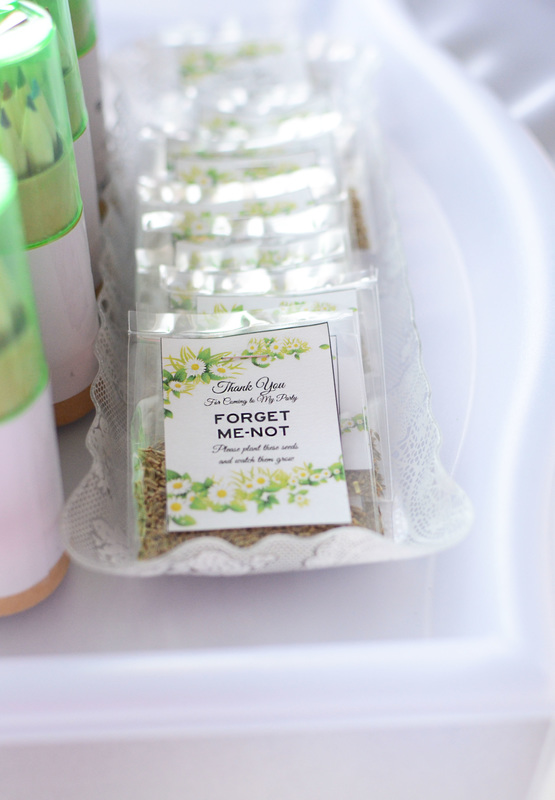 Vendor Credits – Planning/Design/Styling – Silviya of Kurabiiki Photography – Rachelle of Rachele Frickey Photography Venue – Yokosuka Naval Base, Japan 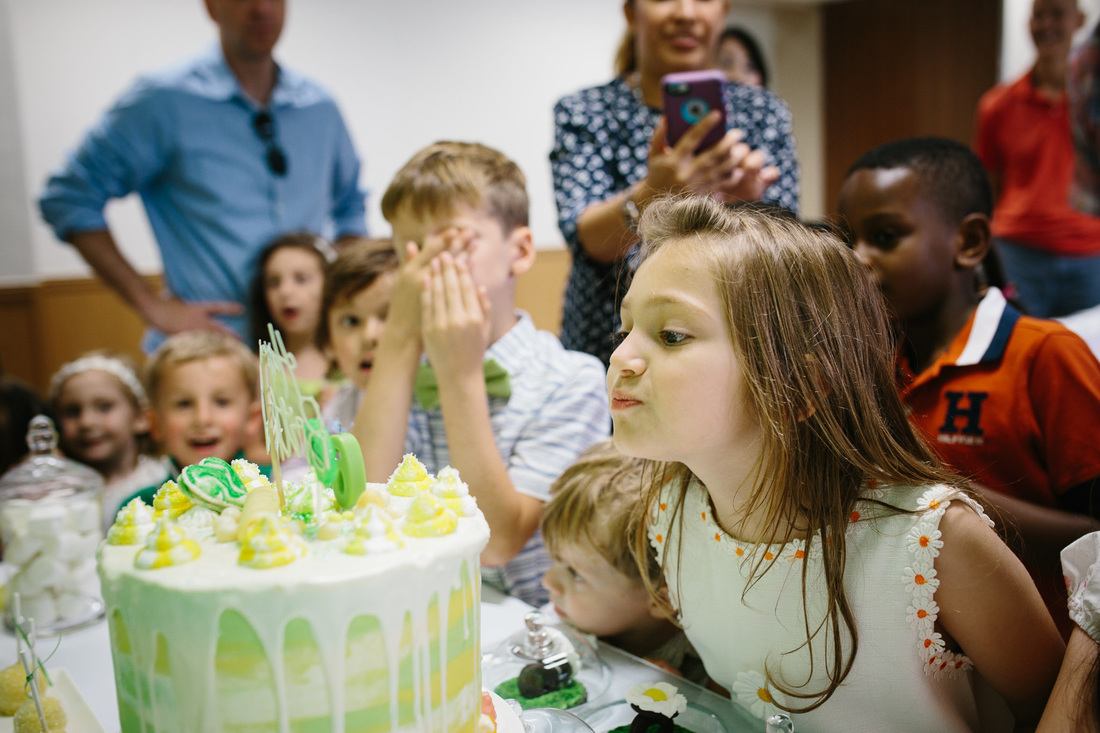 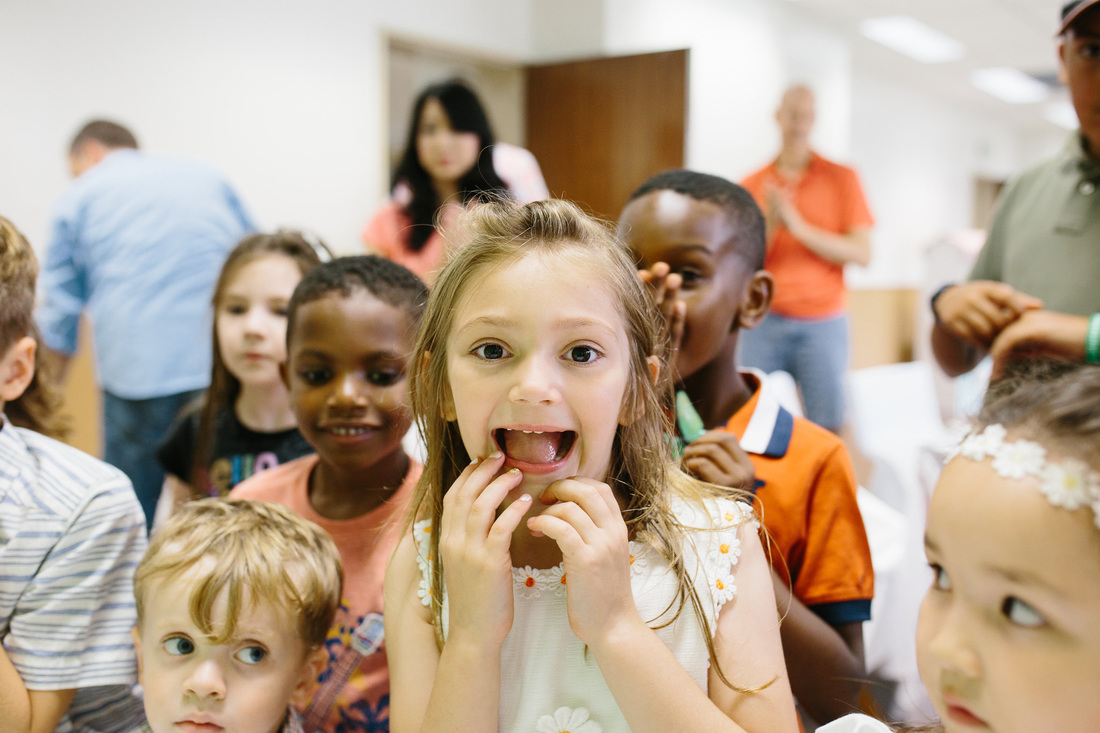 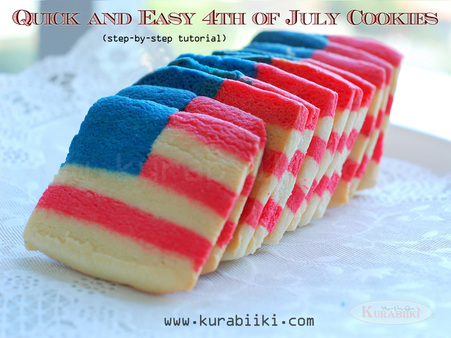
Iced or frosted sugar cookies look beautiful but they do take a lot of time to prepare. On average you would need at least 2 – 3 days in order to bake, ice and decorate them.
If you are short of time but would love to have delicious and beautiful 4th of July cookies on your table this step-by- step guide is for you. These cookies take less than an hour to prepare and they taste heavenly!
The Best Cookie Dough Log Recipe
This is my mother-in-law’s recipe. Please use with caution. The first time I used this recipe I ate about half of the cookies BY MYSELF! If you change the design, you can make these delicious, light and airy cookies to fit any occasion. However, if you planning to frost your cookies with Royal Icing I would highly recommend that you use this recipe. 1 ½ cups sifted confectionery sugar 1 cup butter 1 egg 1tsp vanilla flavoring ½ tsp almond flavoring 2 ½ cups sifted flour 1tsp cream of tartar 1tsp baking soda
I would recommend that you refrigerate the dough for about 2 to 3 hours before you start working with it.
Divide the dough into 3 parts. Use red and blue food coloring to dye the first 2 parts and leave the third one uncolored. 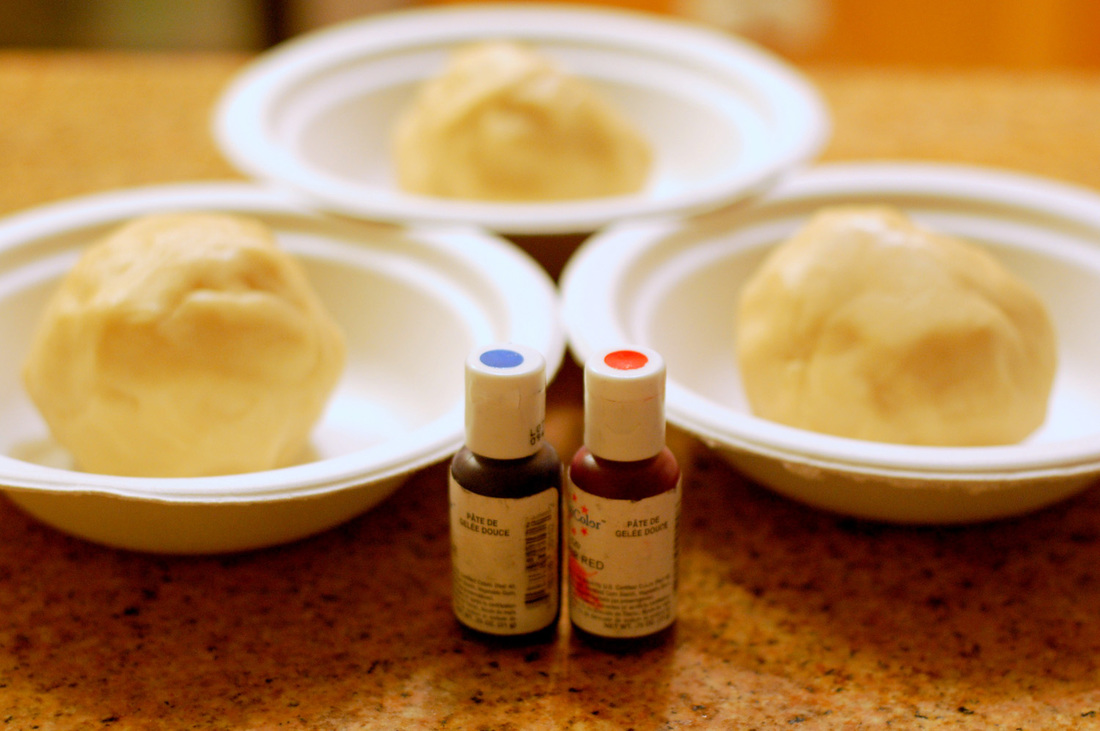
Start with the red ball. Roll out your dough until it’s approximately 0.15” thick. You will need to cut 1 rectangle that is 2.5” x 10” and 2 smaller one, each 1”x 10”. Roll the uncolored dough to the same thickness, but 2 rectangles 2.5” x 10” and one 1”x 10”.
Roll the blue dyed dough until it is 1” thick and cut one rectangle 1.5”x 10” 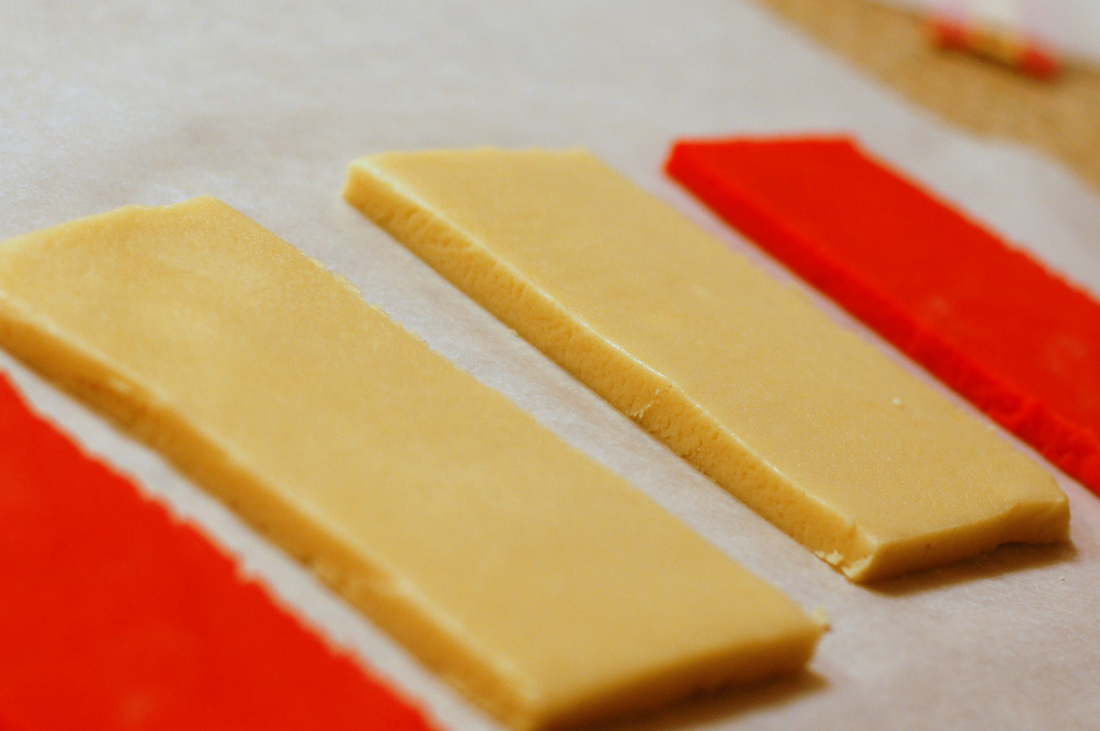
I know this probably sounds complicated, but look at the picture below. In order to make a flag you will have to stack the strips in the following order.

2.5”x10” uncolored (0.15” thick)
2.5”x10” red (0.15” thick) 2.5”x10” uncolored (0.15” thick) 1.5”x10” blue and next to the blue line up the smaller strips starting with the red one (1” thick) Here is how your dough should look when you are finished 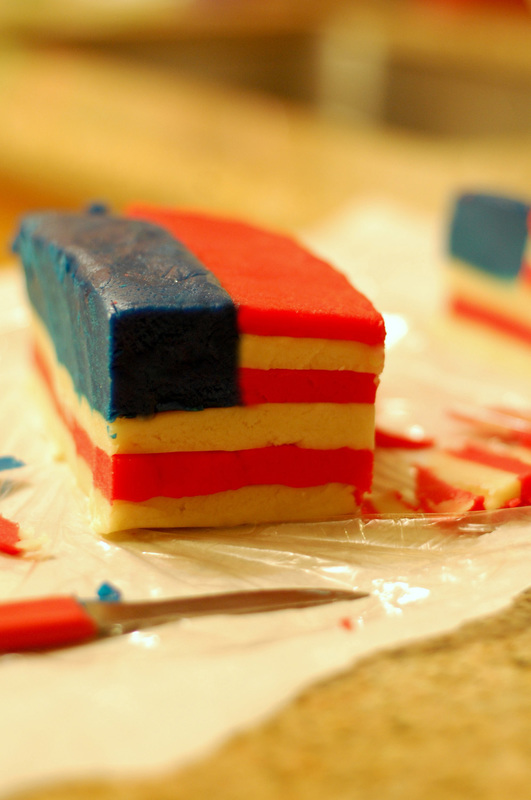
Wrap in clear plastic in put in the freezer for about 20 min.
Once it’s cooled and hard enough to cut, slice the dough to the desired thickness (if you like soft and chewy cookies, cut them a little bit thicker and for thin and crisp cookies, cut really thin) bake at 375 for approximately 7 – 8 minutes. Here is how my cookies came out 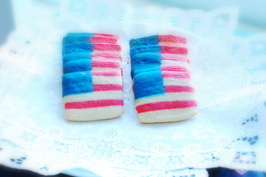
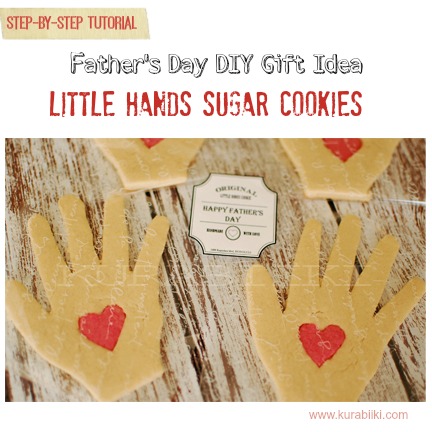
You may also be interested in "Father's Day DIY Gift Idea: Little Hands Sugar Cookies"
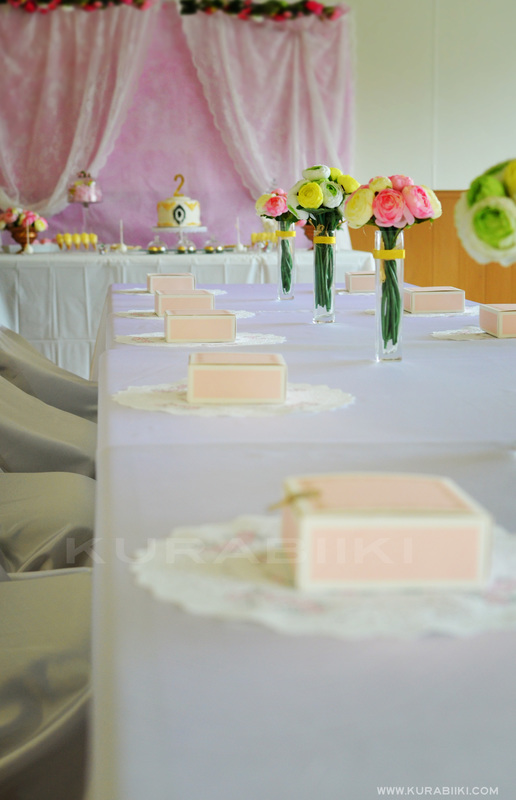
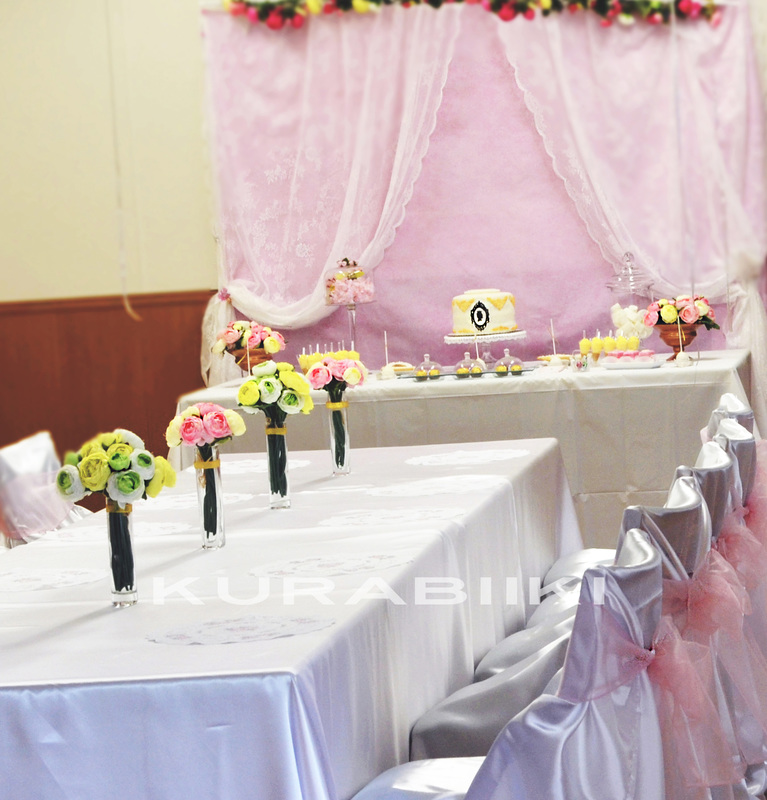
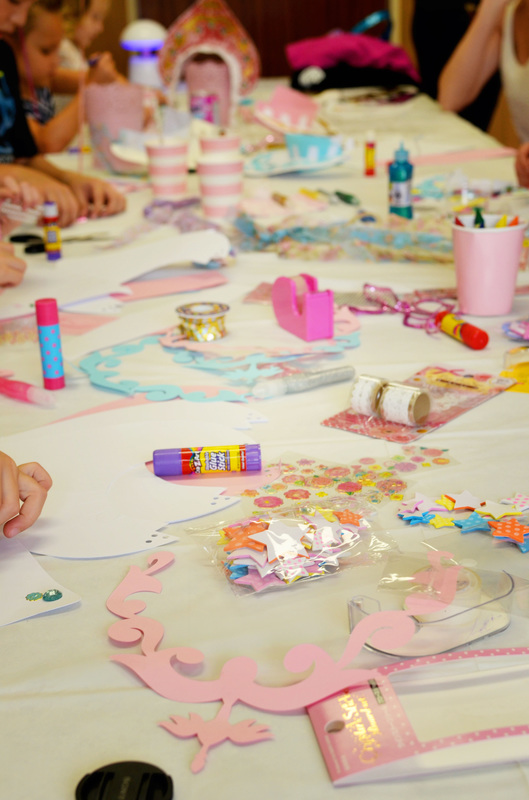
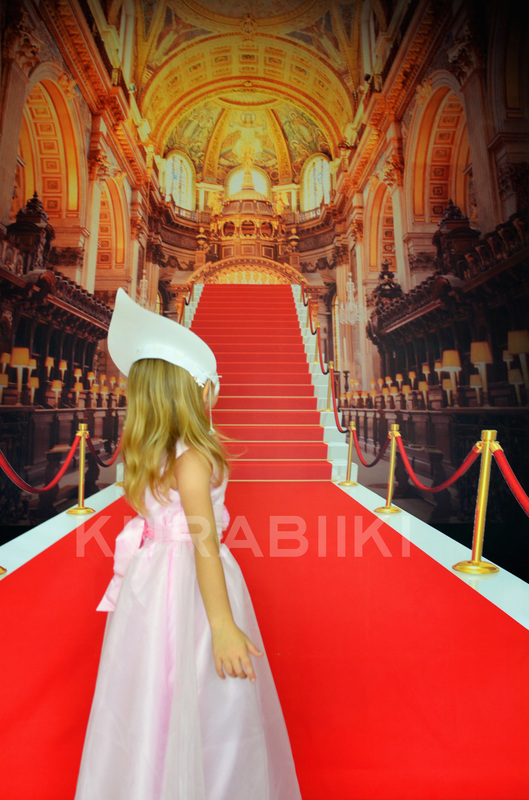
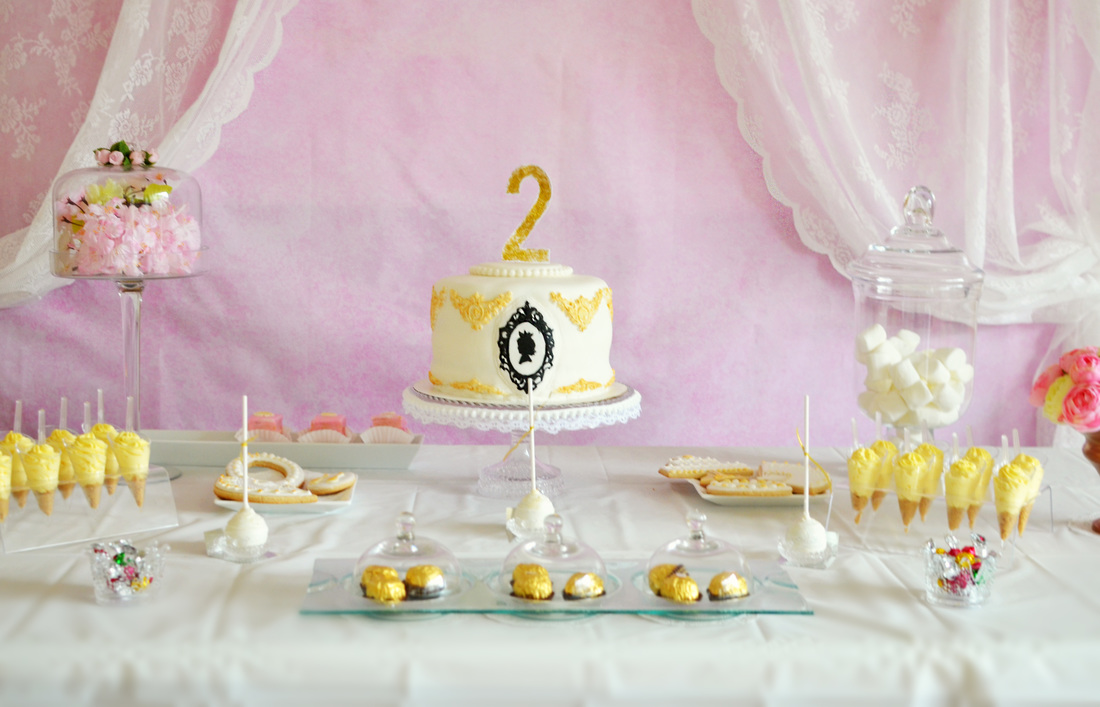
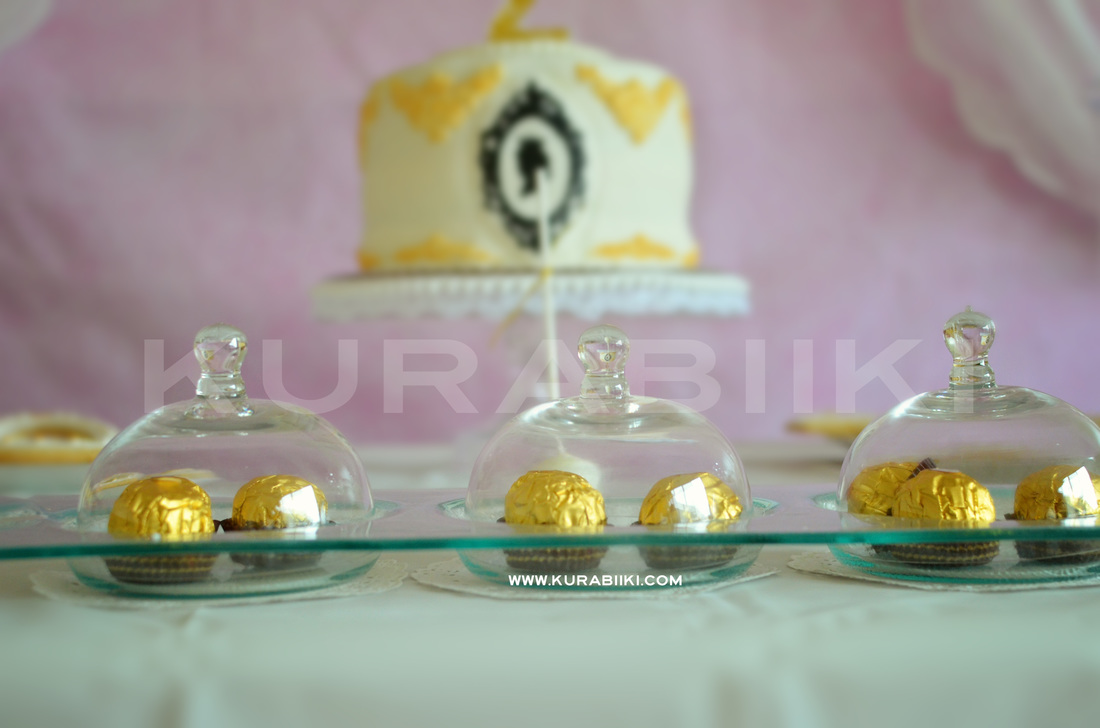
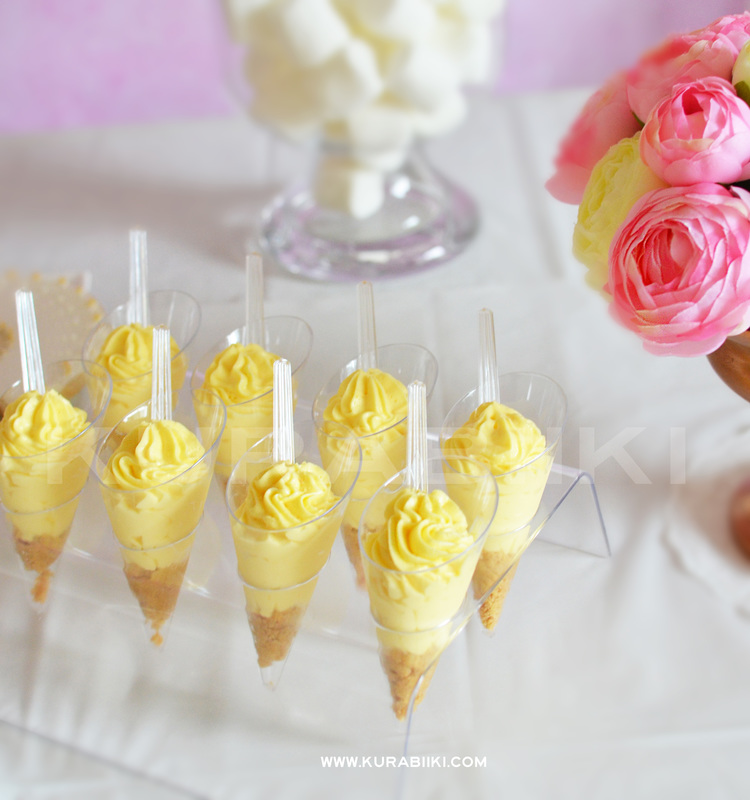
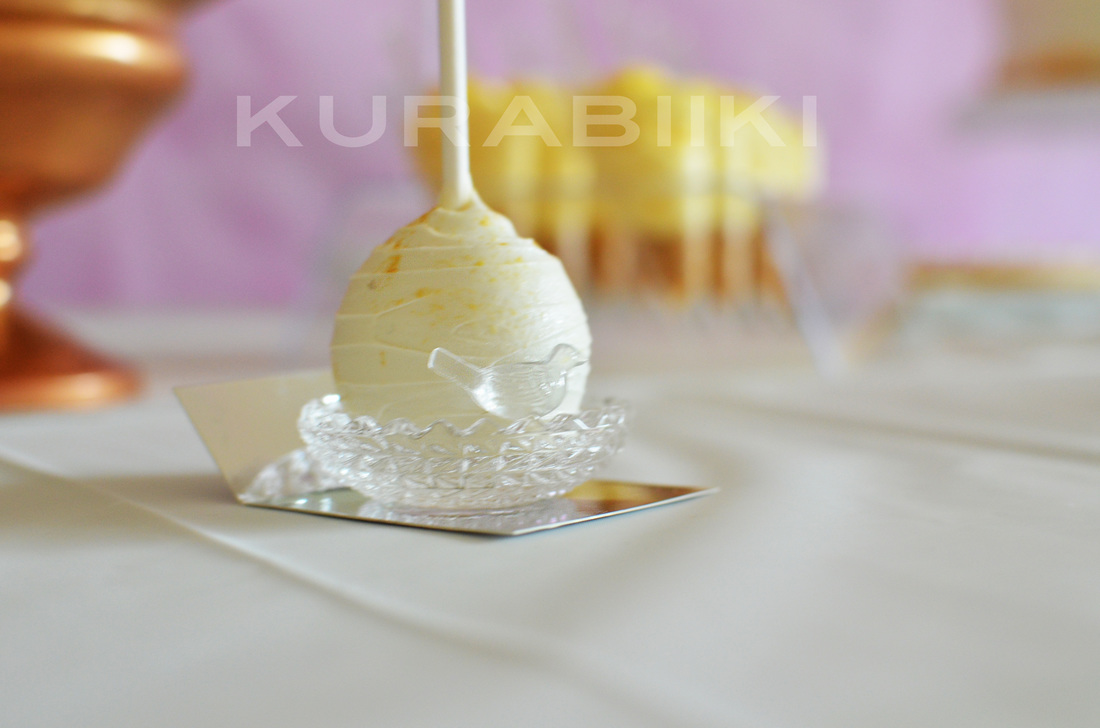
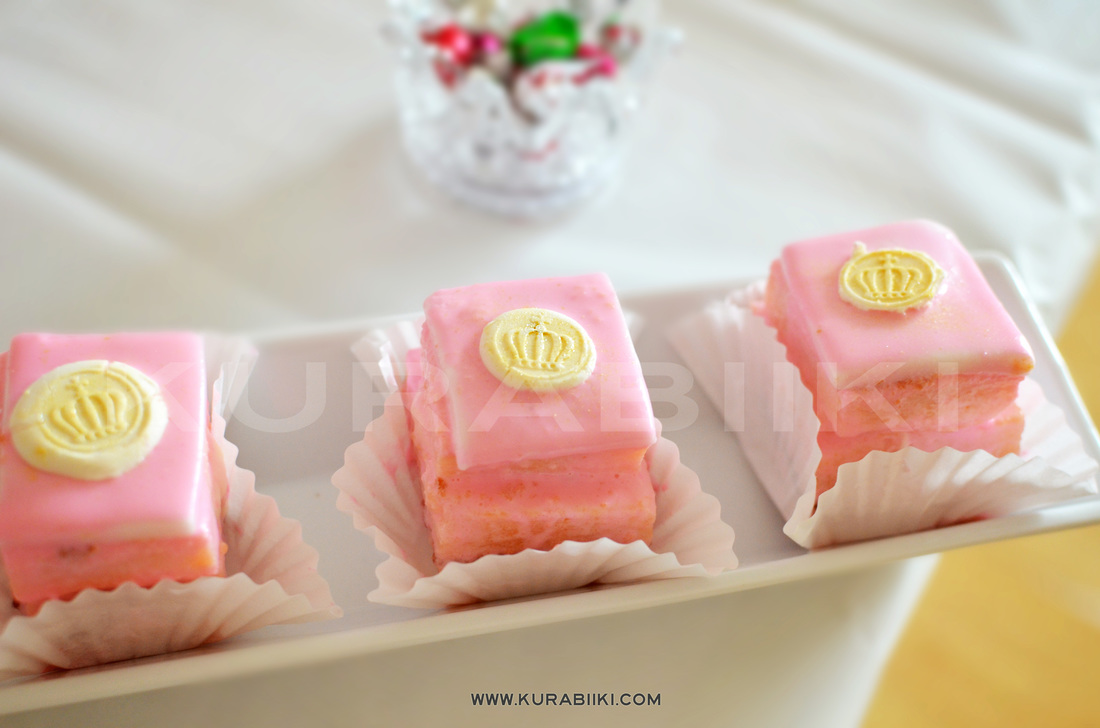
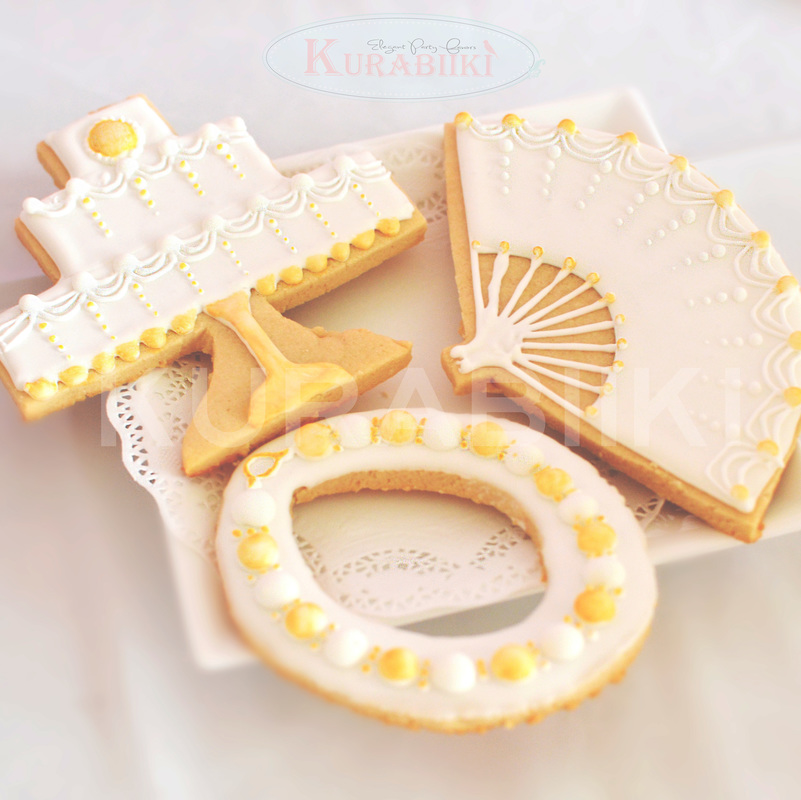
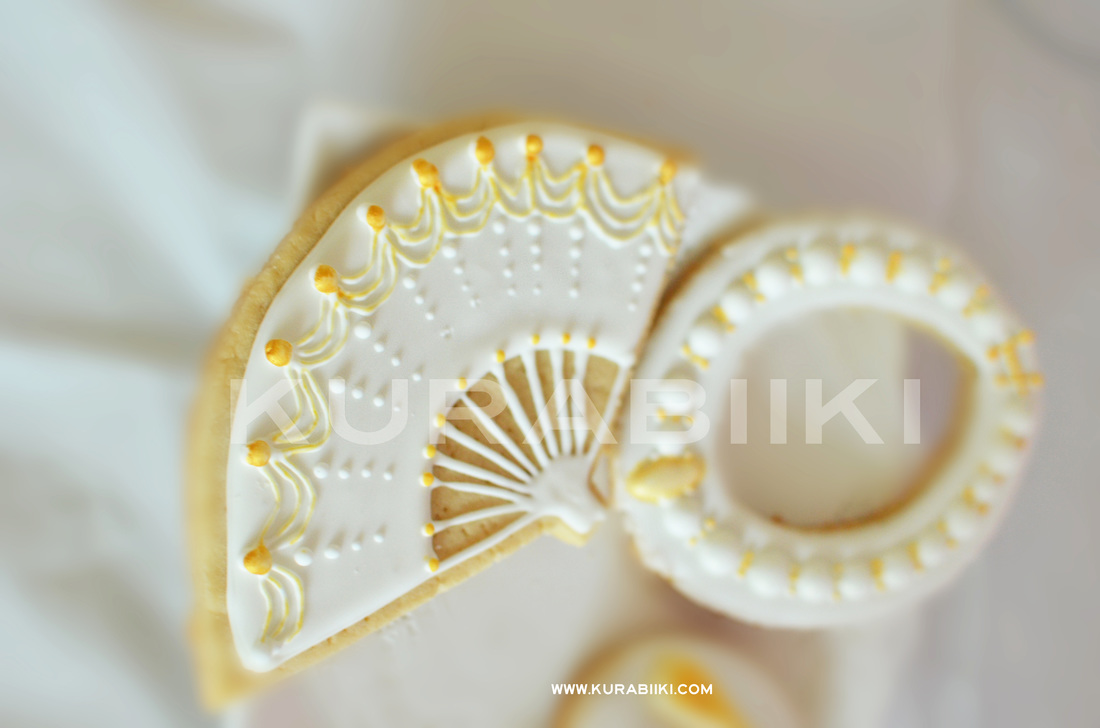
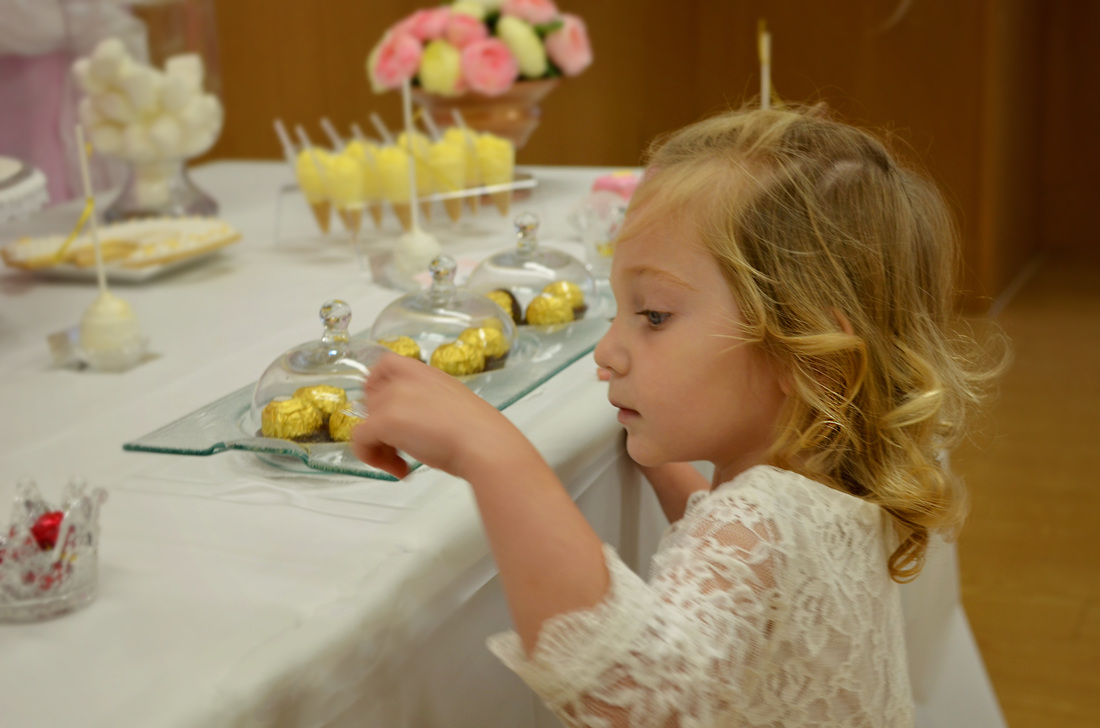
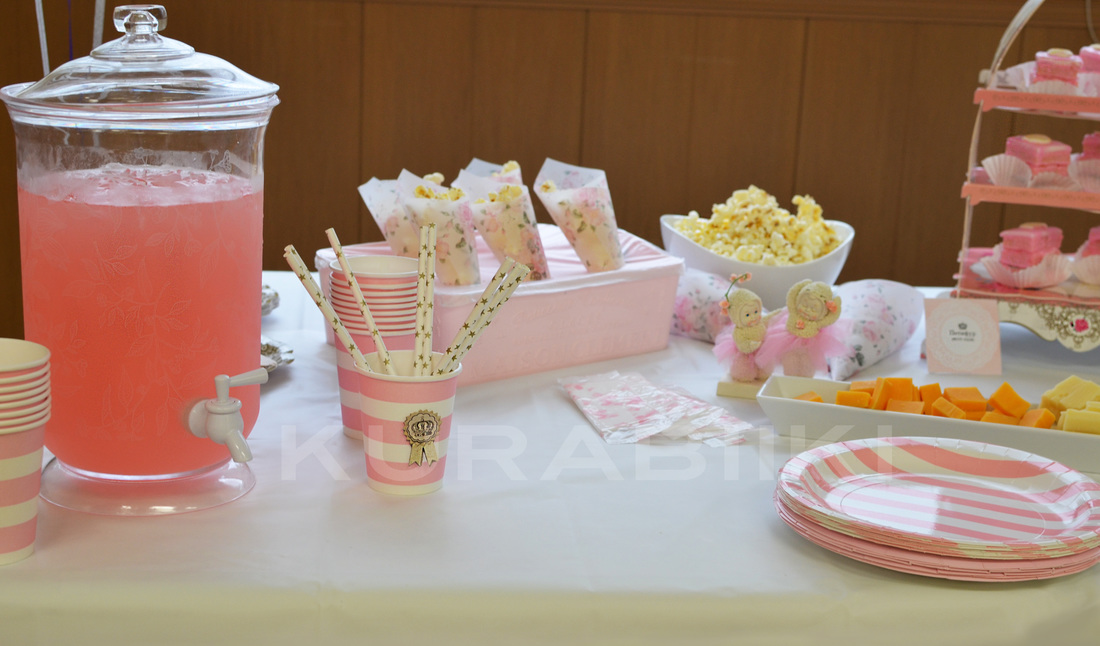
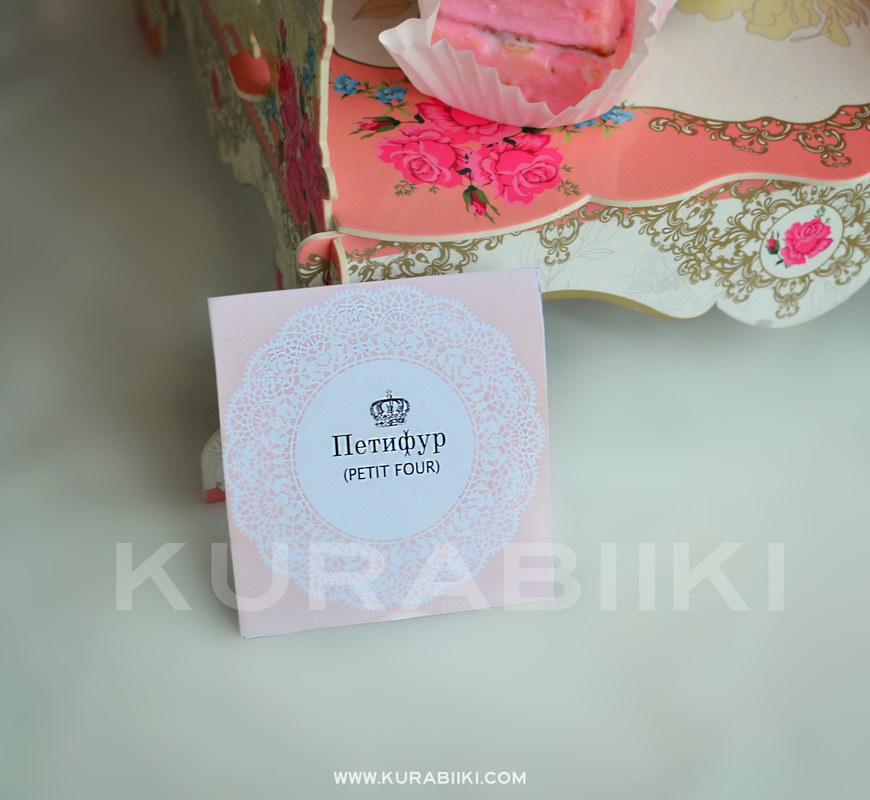
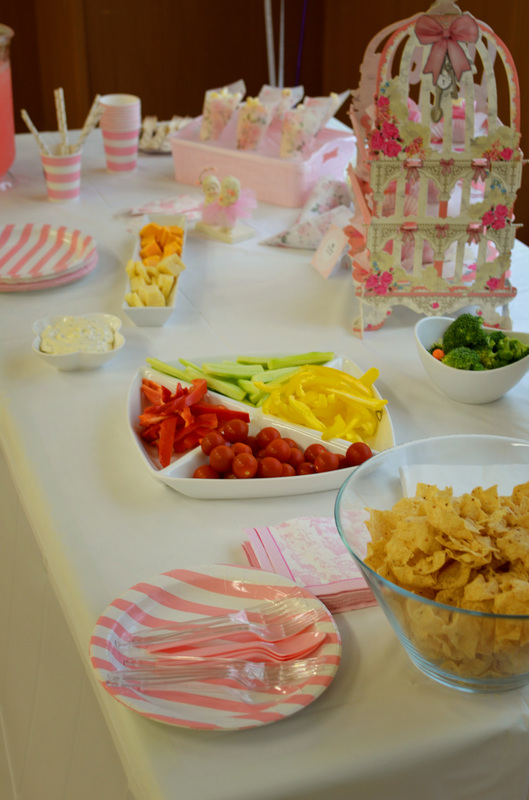
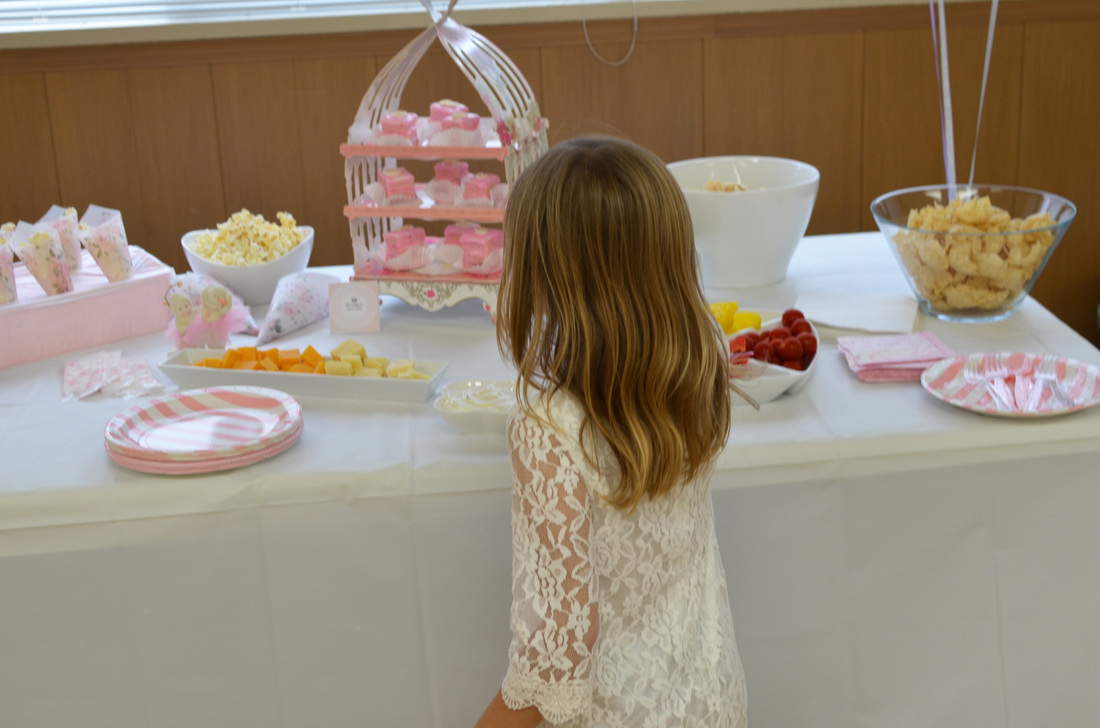
As many of you know, I have two beautiful daughters, Elizabeth and Anastasia, ages five and two, respectively. Elizabeth loves being an older sister, and loves, cares and nurtures for her little sister, trying to teach her new things. She is an elegant little girl and loves all things fashion. Anastasia is a free spirit, with her big blue eyes and her blonde wavy hair, she always wants to do things in her own special way. She is outgoing and loves to make new friends! Anastasia was the last Russian princess, and I thought it fitting to give my littlest princess a party fit for royalty. Unfortunately, we could not give Anastasia a large birthday party on her first birthday, so we wanted to make the second one a bit more special for her. In my typical fashion, I wanted to put everything together on my own. Sometimes, I do need to work on delegating tasks to others, but I so enjoy brainstorming, designing, setting up, baking and preparing everything from scratch. Room Set Up: Setting up the scene were the beautiful white pearlescent balloons floating around the room. With a pink and very princess-y shabby chic set-up, white table cloths adorned with artificial rose bouquets, and chair covers with pink sheer ties. The tables were also set with special pink and gold snack boxes to ensure that our little princesses stayed energized for all the fun! We set up one long table to seat our little guests, and also a craft table at the opposite end of the room. A princess backdrop was placed, where guests were invited to come over and take photographs after having some fun at the craft table, where traditional Russian headdresses, called kokoshnic were made! The kokoshnic craft table was set up with tons of jewelry, beads and sparkles for the girls to decorate their crowns with! I had originally looked everywhere online for a kokoshnic template, but could not find one, as hard as I tried, so I created one myself, instead. You can download the template here! Dessert Table The dessert table was filled with all sorts of goodies! The centerpiece was a vanilla cake with fluffy Italian meringue filling, all covered with delectable fondant, embellished with a princess silhouette in the middle, all adorned with gold filigree elements along the side of the cake, and a golden 2 topping off the cake. Chocolate cake pops were also being offered, covered with white marshmallow chocolate and sprinkled with gold dust, all swirled to perfection. There were of course, sugar cookies, in the shapes of princess jewelry, cakes and fans! The vanilla mousse was also a big hit, served in an ice cream cone with a small spoon, for an elegant treat. Pink petit fours adorned with a white and gold crown “seal,” were also served for the little royalty. We also had an extra table with sweet and savory snacks for our princesses to munch on, with everything from popcorn in shabby-chic printed parchment paper, to yummy vegetables, a variety of cheeses, and of course, pink lemonade to match the party theme! Labels for everything were written in both Russian and English to add a bit of flourish to our tables. Favors were packed in beautifully elegant pink and white lace bags. The Response Anastasia was rather quite interested in eating her pizza and trying not to be photographed, no matter how much a tried. She even made sure to hide and run away anytime I would pick up the camera! Elizabeth enjoyed her little sisters party and looks forward to the next one! |
AuthorWelcome! I'm Silviya, a Mom of two beautiful girls and a wife to one amazing man. Find out more about me here Archives
January 2021
|


 RSS Feed